In Audacity, let’s say you have one audio track that has some silence in it that you’d like to fill with white noise. The problem is the white noise is on the same track as the silence, so how can you do this?
You can highlight the whitenoise, copy it, choose another location on your track (or range) and paste it, and that works. However this could cause the timing to change if the copied clip has a different duration than the range selected for the paste, or if you didn’t choose a range, it’ll shift all of the further audio.
The other method to do this is to use multiple tracks.
Use Audacity to Fill Silence With White Noise From The Same Track
- Highlight the range of the white noise you’d like to keep as your background whitenoise track.
- Choose Edit -> Duplicate. This will create a new track with only your selection.
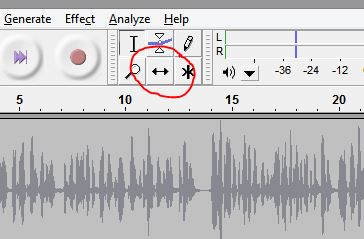
- Using the Time Shift Tool, you can then move the chunk of whitenoise left or right to position where you need it.

- To create another piece of whitenoise, switch back the Selection Tool, and double click the whitenoise chunk.

- Choose Edit -> Copy or use the keyboard shortcut Ctrl + C to copy the whitenoise chunk.
- Select another location on the track where you’d like to place the second piece of whitenoise.
- Choose Edit -> Paste or use the keyboard shortcut Ctrl + V to paste the whitenoise into the track. This can then be moved using the Time Shift Tool as described above.
- You may also want to fade in and out the whitenoise clip to blend it in more naturally. To do this, select a portion of the clip beginning or end and choose Effect -> Cross Fade In or Effect -> Cross Fade Out respectively.
- Once you are done editing your track, you can choose File -> Export to export a final audio file. A warning will display letting you know that these two tracks will be merged – which is our desired method here.