When setting up a smart home – especially in the early stages – there will be many “non-smart” devices in the house. An option is to replace them with newer “smart versions”. But that’s costly and in some instances, not possible to find smart options – or safe/wise ones to purchase. So what is a person to do – how can the “dumb devices” in the “soon-to-be-smart-home” become smart? Easy (and inexpensive) – add an IR / RF Blaster to Home Assistant.
An IR / RF Blaster sends Infrared (IR) and Radio Frequency (RF) signals to the “dumb-devices” in the “smart-home”. In other words, it takes the remote control that came with the TV, heater, lights, etc. in the house and puts them into Home Assistant. How cool is that?

Contents
- 1 Why Use an IR / RF Blaster
- 2 A Home Assistant Universal Remote
- 3 IR / RF Blaster Options for Home Assistant
- 4 Setup the BroadLink RM4 Pro IR Blaster Device
- 5 Connect the BroadLink RM4 Pro to WIFI Network
- 6 Home Assistant Integration to BroadLink RM4 Mini/Pro IR Blaster
- 7 Learning IR and RF Codes in Home Assistant
- 8 Testing Programmed Remote Control Codes with the IR Blaster
- 9 Deleting IR and RF Codes in Home Assistant
- 10 Using BroadLink RM4 Programmed Codes with Home Assistant
- 11 Changing WIFI Network in Broadlink RM4 Pro
- 12 NOTES
- 13 Resources
Why Use an IR / RF Blaster
Many perfectly good devices within a home use the older non-smart technologies – Infrared (IR) and Radio Frequency (RF). One option to make these devices controllable by Home Assistant is to replace them. This means spending more money, creating e-waste in disposing of what is likely a perfectly good device, and a lot of hassle. Additionally, there’s a chance that a smart version of this device doesn’t exist on the market place yet. If it does, it’s most likely priced substantially higher.
For a marginal investment (particularly when considering the cost to replace existing devices) an IR / RF blaster can be added to Home Assistant to make those devices controllable by Home Assistant. And as new devices get added to the home they can be easily setup on the same IR blaster.
A Home Assistant Universal Remote
To be clear – an IR / RF Blaster is really just a Home Assistant universal remote. It’s like the old universal remotes you’d buy at Radio Shack back in the day to control all of your devices (is it just me that remembers those beasts?). But this is better. Why?
- Because it’s part of Home Assistant (who doesn’t love that!)
- An IR / RF Blaster is a universal remote for ANY IR / RF device – not just your TV
- The IR Blaster is custom-programmed to whatever device it is needed to control
This is the universal remote to rule all universal remotes – built into Home Assistant (and your smart phone if you’ve set it up there as well)!
IR / RF Blaster Options for Home Assistant
There are a few options on the market of IR blasters for Home Assistant. The BroadLink devices are very well put together and thus the focus of this post. There are some older versions that are still available for purchase at the time of writing, however the focus will be on the current version – the RM4 series. The BroadLink seems to be as minimal-cloud-based as a modern IOT device comes. For that reason this is a wise choice to add to the network.
| RM4 Mini | RM4 Pro | |
|---|---|---|
| Brand | BroadLink | BroadLink |
| Price | $21.99 RM4 Mini Only $29.90 RM4 Mini with HTS2 Sensor | $44.90 RM4 Pro Only $49.90 RM4 Pro with HTS2 Sensor |
| Purchase Link | RM4 Mini Only RM4 Mini with HTS2 Sensor | RM4 Pro Only RM4 Pro with HTS2 Sensor |
| IR (Infrared) | Yes | Yes |
| IR Range | 8 meters | |
| IR Frequency | 38kHz | 38kHz |
| RF (Radio Frequency) | No | Yes |
| RF Frequency | N/A | 433MHz [2] |
| Temperature Sensor | Optional [1] | Optional [1] |
| Humidity Sensor | Optional [1] | Optional [1] |
| WiFi | Wi-Fi 802.11b/g/n 2.4GHz only | Wi-Fi 802.11b/g/n 2.4GHz only |
| Power Source | USB (5V DC 1A) | USB (5V DC 1A) |
| Dimensions | 1 7/8″ x 1 7/8″ x 1 3/4″ | 3 7/16″ x 3 7/16″ x 1 1/4″ |
| Weight | 3.7 ounces | 5.3 ounces |
| Mounting Plate Included | Yes | Yes |
| Supported Until | July 31st, 2025 | July 31st, 2025 |
[1] Temperature and humidity sensors are available via the optional sensor in the HTS2 power cord. This cord can be purchased in a bundle with the device at an often lower price than buying them separately. The HTS2 power cord is used instead of the standard USB cord. It has a rectangular sensor attached to it that detects temperature and humidity.
[2] 433Mhz fixed code only supported. 315Mhz and rolling codes not supported. This product supports 305~355Mhz and 430~440Mhz. However, in some countries such as the United States, Canada, Australia, and all EU countries the 303~335Mhz band is not available.
NOTEs:
- A USB power brick / adapter is not included with the BroadLink RM4 devices.
- The BroadLink RM4 devices are designed for indoor dry environment use only
BroadLink RM4 Mini

If space is a consideration, the RM4 Mini is the device to go with. This small unit will do a great job of managing the IR devices in your home while taking up about as little space as you could expect.
This device can have the HTS2 power cable added to it to expose the temperature and humidity of the room it’s in to Home Assistant – thus allowing for some dynamic automations.
BroadLink RM4 Pro
This is quite the all-in-one package – control IR and RF devices from the same unit. With the added HTS2 cable (really cheap enough to add on it feels like a no-brainer to not…) to monitor temperature and humidity so much more can be done like trigger fans, air conditioners, blinds, heaters, etc. to be turned on or off as needed.

Setup the BroadLink RM4 Pro IR Blaster Device
- Unpackage the IR blaster
- Connect the USB cord to a USB power source and plug into the IR Blaster.
Connect the BroadLink RM4 Pro to WIFI Network
Sadly there isn’t a way to setup the BroadLink RM4 Pro without creating an account with BroadLink and setting up the device through their app. But once this step is done, the device can be managed through Home Assistant and the BroadLink app won’t be needed.
- Install the Broadlink app from the app store on your mobile device:
- Set the country in the app on your mobile device
- Login to your BroadLink account or create one if needed.
- From the apps homepage after logging in, tap the + Add device button.
- Tap the Add A New Device button
- Tap the IR and RF devices button
- Tap the Universal Remote button
- Choose the device you wish to setup
- At this point the app will walk through a series of steps to connect the device to the WIFI network. Follow the on screen directions.
- Set the name of the device and sub-devices (temperature and humidity sensors from the HST2 if added). This name will carry through to Home Assistant so wise to set it accurately here.
- Setup is now complete in the BroadLink app.
- Click on the Use Device Now button
- The IP address of this device will be needed to connect the device to Home Assistant. Click on the … icon in the top right and choose Property
- Choose Device info. The IP address can be found in the Device IP entry. Note this for the Home Assistant setup section.
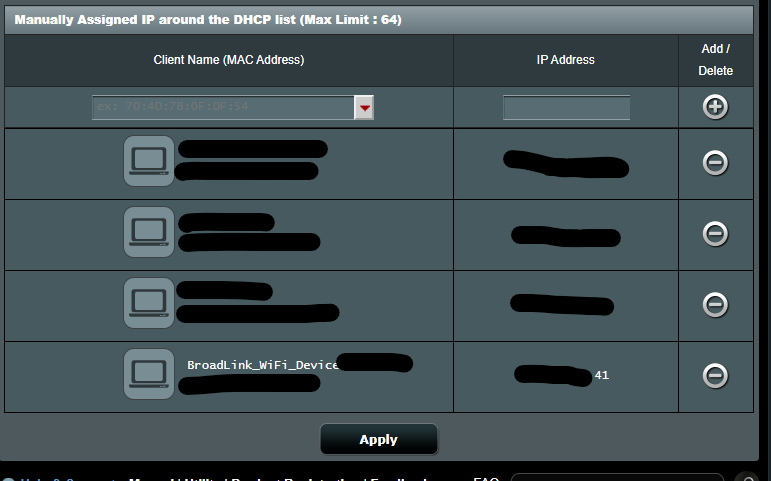
WIFI Network IP Address
When the BroadLink RM4 Pro IR Blaster or the networks router restart, it’ll likely hand out a random available IP address to this device. This will disrupt the connection of this device to Home Assistant as the BroadLink Home Assistant integration connects via an IP address.
To prevent this issue from happening, the IP address should be reserved in the networks router. Each network is going to be different on how to configure this so the specifics of this setup will not be covered here. But these screenshots are an example of how the dynamic DHCP configuration was changed to a static IP.


Home Assistant Integration to BroadLink RM4 Mini/Pro IR Blaster
The Broadlink Home Assistant integration provided by BroadLink is used to connect the RM4 Pro (among other BroadLink devices) to Home Assistant.
- Click on Settings
- Click on Devices & Services
- Click the + ADD INTEGRATION button
- Search for Broadlink
- Click on the Broadlink integration
- Enter the IP address found in section Connect the BroadLink RM4 Pro to WIFI Network step 13. Click Submit.
- If the RM4 Pro device is locked, a warning will be displayed. If not, this screen will not be displayed.
- Chose a name for the BroadLink RM4 Pro in Home Assistant and click SUBMIT.
- Set the area for the BroadLink RM4 Pro in Home Assistant. Then click FINISH.
Now that the BroadLink RM4 Pro has been integrated into Home Assistant one device was added with 3 entities:
- Controls
- Sensors


Learning IR and RF Codes in Home Assistant
Now that the RM4 Pro is connected to Home Assistant, the next step is to learn the codes emitted by the IR and RF remote controls that will now be controllable by Home Assistant. This is a manual process and can be a bit tedious, but once this one-time setup is completed Home Assistant will be able to control non-smart devices moving forward. The code learning process will be done in Home Assistant.
- In Home Assistant, click on Developer Tools
- Click on the Services tab
- In the Service input, choose Remote: Learn Command
- In the Targets section click on the + Choose device button and select the RM4 device.
- Check the checkbox for the Device section. In the input box type the name of the device to learn codes for. For example:
Lasko Space Heater 5132 - Check the checkbox for the Command section. In the input box type the name of the button(s) to learn codes for.
Example
- Power
- Temperature
- Check the checkbox for the Command Type section. Select the respective radio button for the remote type being programmed.
- Click the CALL SERVICE button to start the remote control code learning process in Home Assistant. If multiple buttons were defined in the Command section, Home Assistant will walk through that list one by one in the order the buttons were specified.
Example:
# .storage/broadlink_remote_a043b0b9fc02_codes
{
   "version": 1,
   "minor_version": 1,
   "key": "broadlink_remote_a043b0b9fc02_codes",
   "data": {
     "Lasko Space Heater 5132": {
       "Power":
"JgDCACoMKwwQJywLLAwPKBAnECcQKA8oECcs6CwMKw0PJywMKwwQJxAnECcQKBAnECcs6CwMKw0PJywMKwQJxAnECgPKBAnECcs6SsMLAwPJywMKw0PJxAnECgQJxAnECcs6SsNKwwPKCsMKw0PJxAoDygQJxAnECgr6SMLAwPKCsMLAsQJxAoECcQJxAnECgr6SwMKwwPKCsNKwsQKA8oECcQJxAoDygr6SwMKwwQJysNKwsQKBAnECcQJxAoECcrAA0F",
       "Temperature":
"JgBsASgNKg4OKSoNKg0PKQ4pDikPKCsNDikOAAEGKg4qDQ4pKg0qDg4pDikPKA8pKg0OKQ8AAQUrDSoNDygqDioNDikOKQ8pDikqDQ8oDwABBioNKg0PKSoNKg0OKQ8oDykOKSoNDykOAAEGKg0qDQ8pKg0qDQ8oDykOKQ4pKg4OKQ4AAQYqDSoODikqDSoNDykOKQ4pECcqDg4pDgABBioOKg0OKSoNKg4OKRAnDygPKSoNDikPAAEFKg4qDQ4pKg4qDQ4pDikPKQ4pKg0PKA8AAQYqDSoNDygqDioNDikPKQ4pDikqDQ8oDwABBioNKg0PKSoNKg0PKBAoDikOKSoODikOAAEGKg0qDg4pKg0qDQ8pDikOKQ8oKg4OKQ4AAQYqDikODi0mDSoODikOKQ4pDykqDQ4pDgABBioOKg0OKSoOKQ4OKQ4pDygPKSoNDioOAAEGKg0qDQ8oKg4qDQ4pDygPKQ4pKg0PKA8ADQU="
     }
   }
 }
This process will need to be repeated for each of the remote controls for each of the devices that need to be programmed into Home Assistant. Keep in mind this programming process is a one time task.
Testing Programmed Remote Control Codes with the IR Blaster
Now that the codes are programmed, the part we all are excited for can be done – test triggering a device from Home Assistant without the physical remote. This is a very gratifying step!
- In Home Assistant, click on Developer Tools
- Click on the Services tab
- In the Service input, choose Remote: Send Command
- In the Targets section click on the + Choose device button and select the RM4 device.
- Check the checkbox for the Device section. In the input box type the name of the device to learn codes for. For example:
Lasko Space Heater 5132 - In the input box for the Command section type the name of the button to delete the code for. This should exactly match one of the codes learned in the prior section. Only delete one code at a time.
Example:
- Power
- Temperature- Click the CALL SERVICE button.

There are other useful controls that can be triggered here as well such as a repeat or delay between commands as well as holding the button down for a specified number of seconds.

Deleting IR and RF Codes in Home Assistant
If a wrong button was pressed when learning codes, that button can be deleted through the Home Assistant Services tab in the Developer Tools section.
- In Home Assistant, click on Developer Tools
- Click on the Services tab
- In the Service input, choose Remote: Learn Command
- In the Targets section click on the + Choose device button and select the RM4 device.
- Check the checkbox for the Device section. In the input box type the name of the device to learn codes for. For example:
Lasko Space Heater 5132 - In the input box for the Command section type the name of the button to delete the code for. This should exactly match one of the codes learned in the prior section. Only delete one code at a time.
- Click the CALL SERVICE button.

Optionally, to confirm that the code has been deleted, read the BroadLink code file located in the Home Assistant file system in the .storage/ directory, file named broadlink_remote_<hash>_codes. and notice the code is no longer present.
Using BroadLink RM4 Programmed Codes with Home Assistant
Now that the IR and RF codes have been programmed into the Home Assistant BroadLink integration, there are several ways to utilize these in Home Assistant. All that needs to be done is to call the Remote: Send Command service to trigger the BroadLink RM4 to send the proper code(s) to the RM4 IR Blaster, thus triggering the device to do the specified actions.
This can be done through Automations directly using the Call Service action. The downside here is that there are several settings to configure, and if a sequence of buttons is desired to be pressed at once, this is additional configuration. If this is only going to be used in one instance that might be passable.
But to make the IR Blaster more reusable – or to use in a Dashboard, it’s best to create an Entity that can then be reused throughout Home Assistant. This is done using the Scripts section of Home Assistant.
Create a Custom Home Assistant Entity for the RM4 IR / RF Blaster
Create a script that calls the IR Blaster commands through the Remote: Send Command action to make a reusable Entity in Home Assistant. This is required to use the RM4 IR / RF Blaster on a dashboard.
- In Home Assistant, click on Settings
- Click on Automations & Scenes
- Click on Scripts at the top of the page
- Click the + Add Script button
- Enter a Name for this script (example:
Space Heater Power) - Select an Icon for the script
- Home Assistant will auto-fill in an Entity ID. This can be edited as needed.
- Select the Mode. Determine the correct mode to choose depending on the desired actions.
- Under the Sequence section, click the + ADD ACTION button
- Choose Call service from the selection menu
- In the Service dropdown, pick
Remote: Send Command - In the Targets section click on the + Choose device button and select the RM4 device.
- Check the checkbox for the Device section. In the input box type the name of the device to call codes for. This must exactly match the name used when programming the codes.
- Check the checkbox for the Command section. In the input box type the actions to run.
Example:
- Power
- Temperature- Optionally configure the Repeats, Delay Seconds, and Hold Seconds sections as needed.
- Click the SAVE SCRIPT button.

The Entity is now created in Home Assistant. To confirm the entity was created:
- In Home Assistant, click on Settings
- Click on Devices & Services
- Click on Entities at the top of the page
- In the search box at the top, search for the Entity ID created in the above steps.
Create a Home Assistant Automation
This is not an all-inclusive tutorial on how to create an automation. This tutorial will show the two methods that can be used to call the IR / RF Blaster through an Automation in Home Assistant.
The initial steps to setup the Automation are:
- In Home Assistant, click on Settings
- Click on Automations & Scenes
- Click on Automations at the top of the page
- Click the + CREATE AUTOMATION button
- Click Start with an empty automation
- Configure the Triggers section as needed
- Configure the Conditions section as needed
- In the Actions section click the + ADD ACTION button
- Choose Call service
How to configure the service depends on if an entity was created using the above steps or not. If not, calling the service directly can be used as well.
Using a Custom Entity
- In the Service dropdown select the Entity created above.
Directly Calling the Service
- In the Service dropdown, pick
Remote: Send Command - In the Targets section click on the + Choose device button and select the RM4 device.
- Check the checkbox for the Device section. In the input box type the name of the device to call codes for. This must exactly match the name used when programming the codes.
- Check the checkbox for the Command section. In the input box type the actions to run.
Example:
- Power
- Temperature- Optionally configure the Repeats, Delay Seconds, and Hold Seconds sections as needed.
Add to Dashboards
The IR / RF blaster commands can be called from a dashboard, thus making it convenient and easy to control things like TVs remote-based lighting from a dashboard.
- Open a dashboard in Home Assistant
- Click the three dots in the top right and choose Edit Dashboard
- Click the + ADD CARD button
- Choose the Button card
- In the Entity dropdown, select the Entity created above
- Click the SAVE button
- Click the DONE button to save the dashboard
Changing WIFI Network in Broadlink RM4 Pro
If the networks WIFI equipment is changed, it’s best to re-use the SSID (network name) and password for the new network equipment. This is a smart choice to ensure the Broadlink RM4 devices seamlessly connect to the new network equipment without any issues. However there are times/situations where this isn’t possible and thus the networks SSID or password change and you’re left without an option but to reset the network the RM4 is connected. Like many IoT devices, this isn’t as easy as saying “change the connection”.
In the Broadlink app on your mobile device is where the network connection needs to be reset. This will require deleting and re-adding the device sadly. The app does provide an export method for any settings and devices that may have been added to the IR Blaster through the app which helps to reset things quicker.
- Open the Broadlink app on a mobile device
- Select the RM4 device from the main page
- Tap the
...icon in the top right - Tap the Backup option
- Tap the Backup now option
- Once the backup is complete, tap OK
- Tap the
...icon in the top right - Tap the Property option
- Tap the Delete device option and delete the device.
- On the RM4 device itself, use a paperclip or wire to press and hold the Reset button on the back of the device for 5-10 seconds until the blue light on the front rapidly blinks
- In the Broadlink app on the mobile device, go back to the main page and press the
+icon in the top right - Tap the Scan QR code option
- Scan the QR code on the bottom of the RM4 (under the mounting plate) and proceed through the setup steps to get the device added back into the app. This is where the network connection will be set.
- In the Broadlink App from the home screen, tap the RM4 device
- Tap the
...icon in the top right - Tap the Restore option
- Tap the name of the backup from they My backup list
- Once the backup process is complete, close the app and reopen it. The custom settings from the backup will now show.
NOTES
- The IR / RF Blaster makes the non-smart devices smart. Sort of. A command is sent to the device via Infrared or Radio Frequency communications. However, given the communication protocols used, the device can not communicate back to Home Assistant to report it’s state. So Home Assistant doesn’t know if a device is powered on or off, the volume level, open vs closed state, etc. Home Assistant will merely send a one way communication to the IR / RF device and trigger that action. This isn’t overly ideal, but it’s better than having no communication with the device from Home Assistant at all.
- I personally had an issue accessing the Developer Tools -> Services tab in Home Assistant when using Chrome. A Javascript error was thrown by Home Assistant. I initially was on Home Assistant version
2022.6and tested updating to2022.11.5but the issue persisted. I was however able to use Firefox to get the page to render correctly.
