This tutorial shows how to use deCONZ and Phoscon App connected to a ConBee II USB Zigbee gateway for adding Zigbee devices to Home Assistant on a QNAP TS-251 NAS. The ConBee II device is a reliable USB device for a stable Zigbee network, ensuring a quality smart home setup.
Contents
- 1 What is a ConBee II USB Zigbee Gateway Device?
- 2 What is deCONZ
- 3 What is Phoscon App?
- 4 Connect ConBee II to QNAP TS-251
- 5 Install deCONZ with QNAP Container Station
- 6 Access the Phoscon App Web Interface
- 7 Confirm the ConBee II Device is Recognized by deCONZ
- 8 Update the Firmware on the ConBee II Device
- 9 Add a Device in the Phoscon App Website Interface
- 10 Integrate deCONZ with Home Assistant
- 11 Access deCONZ Graphical Interface via VNC Viewer
- 12 ConBee III
- 13 Resources:
What is a ConBee II USB Zigbee Gateway Device?
ConBee II small USB stick made by Phoscon that has a Zigbee radio within it for building a Zigbee device network into a smart home network. The ConBee 2 is a local device, meaning registration with a third party cloud service is not needed. This keeps all network data on the local network which reduces security concerns, leaking of your data, etc. The ConBee II device is the cornerstone of building a strong Zigbee network.

Full product details can be found on the dresden elektronik website. https://phoscon.de/en/conbee2
A ConBee II USB device can be purchased at many electronics retailers.
What is deCONZ
deCONZ is free software provided by Dresden Elektronik to visualize and configure a Zigbee network. deCONZ handles the API calls between the ConBee II device and the Zigbee devices. It has an open API that has been used by many device manufactures (like IKEA, Philips and Xiaomi/Aqara) as well as home automation systems like Home Assistant.
deCONZ runs silently in the background but does have a graphical component as well. Accessing the graphical component will be discussed later in this tutorial in the section titled: Setup VNC Viewer Connection to deCONZ, however in-depth usage of deCONZ will not be addressed here.
What is Phoscon App?
dresden elektronik provides the Phoscon App as a web based interface that is used for adding new devices to the Zigbee network via the deCONZ integration. The Phoscon App does have some basic home automation tools within it, and it would be possible to use this to build out some smart home automation. It is limited however in what it offers and thus Home Assistant can be used to make more complex automation schemes. This tutorial will focus on how to connect Zigbee devices to Home Assistant through the ConBee 2 and Phoscon App configuration should that layer be necessary.
Connect ConBee II to QNAP TS-251
Insert the ConBee II USB stick into an open USB port on the back of the QNAP TS-251.
Confirm the ConBee II device is seen by QNAP
SSH access to the QNAP NAS server is needed to confirm that the ConBee II device is recognized by the system and identify what address the device has been given. QNAP provides an article on how to setup SSH access: How do I access my QNAP NAS using SSH?.
To confirm that the device is recognized by the file system by running this command via the SSH terminal:
ls /dev/ttyACM*If the device is connected, a second line of output with the address of the device will be returned.
[user@QNAPTS-251 CACHEDEV1_DATA]# ls /dev/ttyACM*
/dev/ttyACM0
Troubleshooting
If the device doesn’t show, add the required drivers by calling this command via the SSH command line.
insmod /usr/local/modules/cp210x.ko insmod /usr/local/modules/cdc-acm.koAfter adding the driver, unplug the device, plug it back in, and run ls /dev/ttyACM* again. The device show now be listed.
Install deCONZ with QNAP Container Station
deCONZ and Phoscon App will be installed via the QNAP Container Station application. Containers are essentially virtual machines. The container defines what the core software of the machine is, as well as configuration for how the machine should operate. This includes what hardware devices to connect to, where to store files, variables such as the local timezone, etc.
Container Station is a graphical interface for a Docker container, which has quickly grown to be an industry standard method for making portable virtual machines.
Create a Directory for Container Data
Device specific data should be stored in a local directory on the QNAP server to ensure it is not lost when the container is shut down or updated.
- Open File Station
- Create a new directory in a location you like for this data.
- Example: Create a directory called Container at the root level.
- Create a subdirectory under Container named deconz.
Create container in Container Station
- In the QNAP web interface, open the Container Station application.
- Click Create
- Search for deconz and choose the
deconzcommunity/deconzimage from the Docker Hub tab. - Select the latest image version from the dropdown and click Next.

- Set the basic configuration of the image.
- Set the Name for the image.
- Check the Auto start option.
- Set the CPU Limit to 70%.
- Set the Memory Limit to about 2/3 of the servers maximum memory.

- Click on the Advanced settings >> link
- On the Environment tab, configure / add the following settings:
- DECONZ_DEVICE =
/dev/ttyACM0- Note that this is the same device name was identified earlier in this tutorial via SSH. If for some reason the device is at a different path, adjust accordingly.
- DECONZ_WEB_PORT =
9090- Port to connect to deCONZ via a web connection. Avoid using port
80,8080, and any other ports that are known to be used already on the network.
- Port to connect to deCONZ via a web connection. Avoid using port
- DECONZ_WS_PORT =
9091(optional)- Port to connect to deCONZ via a web connection via HTTPS. Avoid using port
443, and any other ports that are known to be used already on the network.
- Port to connect to deCONZ via a web connection via HTTPS. Avoid using port
- DECONZ_VNC_PORT =
5900- The port that a VNC connection will communicate on. Can be changed if needed
- DECONZ_VNC_MODE =
1- This allows/blocks access to the deCONZ server via VNC (remote access).
0=false,1=true.
- This allows/blocks access to the deCONZ server via VNC (remote access).
- DECONZ_VNC_PASSWORD =
yourSecurePasswordHere- This password will be used for connecting via VNC Viewer
- TZ =
America/Chicago- Set to the desired time zone. The full list of possible time zone names can be found here. The TZ database name column is what value is expected here.
- DECONZ_DEVICE =

- On the Network tab, choose Host for the Network Mode option.

- On the Device tab, configure the following:
- Check the Run containers in privileged mode. checkbox.
- Add ConBee II device
- Click the Add button.
- Select TTY (4) from the Device dropdown. Ensure that both Read and Write are checked.

- On the Shared Folders tab, configure the following:
- Volume from host
- Click the Add button in the Volume from host section.
- Set the Volume from host to the directory created previously (ie.
/Container/deconz). - Set the Mount Point to
/configand ensure the Read and Write options are checked.
- Volume from host

- Click the Create button.
- On the review page, click the OK button.
- Wait just a few minutes as the container is created and booted up. The deCONZ container will show on the Overview tab of the Container Station application.

Updating deCONZ Container in Container station
Updating the deCONZ container in Container Station is fairly easy with Container Station 3.0. New device definitions are added over time as well as improvements to the web app, etc. so it is wise to update from time to time.
But there is one little “gotcha” to be aware of. After updating the container, all of the configured devices go away… Going to each device and re-pairing the devices will bring them back in however the naming of the devices will need to be reset. Also all groups, etc. will be lost. (there must be a way to carry the configuration from old version to new however I don’t have the steps for that at this time…)
- Stop the current deCONZ container in Container Station
- Click the gear icon of the current container and choose Duplicate
- Identify the latest version number from the Docker Hub page: https://hub.docker.com/r/deconzcommunity/deconz/tags
- Set the version number in the Image field (
deconzcommunity/deconz:version.number.here) - Check the Try pulling them image from the registry before creating the container. box
- Click the Next button
- Set the Name field. Include the version number for easy reference in the future
- Uncheck the Default web URL port toggle
- Click the Advanced Settings link
- Click on the Environments tab
- Ensure the version is set correctly for value DECONZ_VERSION
- Click Apply
- Click the Next button
- Click the Finish button
After this is done, in Home Assistant it may be required to re-add the deCONZ hub. The good thing is that the entities are still recognized based on the underlying network name thus you don’t have to rebuild automations and such in Home Assistant.
- Go to Settings -> Devices & services
- Click on deCONZ
- Click the three dots and choose Reload
- If it states it can’t find the hub etc. you may need to now choose the three dots and Delete to remove the hub
- Click Add hub and follow the instructions to add the hub back in
Access the Phoscon App Web Interface
Once the deCONZ container is up and running, the Phoscon App can be accessed through a web browser using the IP address of the QNAP NAS and the port defined on the Environment tab while configuring the container.
Phoscon App Web Interface URL
The URL to the deCONZ website interface uses the IP address of the QNAP server with the port used for setting DECONZ_WEB_PORT for the Container Station configuration.
http://<your.ip.address.here>:<DECONZ_WEB_PORT>http://192.168.0.10:9090
Phoscon App Web Interface Initial Setup
- Click on the icon on the screen with the IP address to start the login process.

- Create a password and click the Next button.

- The next screen wants to setup lights, which you can skip by clicking Proceed without lights if you don’t have any to setup at this time.

- Next is a prompt to create a group of devices. This is can be used to group all of the lights in the house together, or devices in the same room, etc. This is an optional configuration. In the case of this tutorial, Home Assistant will be used for automation and the Phoscon app is only needed for adding devices to the deCONZ api. For that reason, the group setup can be skipped. Click the
Xto close.

Confirm the ConBee II Device is Recognized by deCONZ
Now that the Phoscon App website interface has been setup, confirm that the ConBee II USB device is recognized by Phoscon App / deCONZ.
Click on the hamburger menu in the top left and choose Gateway. Look at what the Firmware is set to. If it says Not connected, Phoscon App is not recognizing the ConBee II USB stick yet. To resolve this issue, the firmware on the the ConBee II device needs to be updated. This is done through an SSH connection using Docker.

If a firmware version is listed, it would be wise to check if there is a newer version of firmware with the steps below.
If the firmware does not need to be updated, skip past the Update the Firmware on the ConBee II Device section.
Update the Firmware on the ConBee II Device
The tutorial steps below walks through the steps to update the firmware on the ConBee 2 USB device. These steps are based on the steps provided by the deCONZ docker Github page. Additional information can be found at the Phoscon website (manufacturer of the ConBee II and deCONZ).
Run Docker command via SSH on the QNAP TS-251
The deCONZ API and Phoscon App web interface are running through a Container Station image, which really is a Docker image. Docker is a framework for running virtual servers and can be managed via the SSH command line.
QNAP does not expose the docker command by default. For that reason, it needs to be exposed before proceeding. This can be done by running the following command (more information can be found about at this article: Accessing Docker Command on QNAP):
export PATH=$PATH":/share/CACHEDEV1_DATA/.qpkg/container-station/bin/:"Get the Docker Image ID
Running this command will list all of the docker containers and search (using grep) for those named deconz. The first column is the container ID and is needed on the next step to check if there is a firmware update available.
docker container ls --all | grep -i deconz
78156f88ed1a   deconzcommunity/deconz:latest                "/start.sh"              10 days ago      Exited (143) 19 minutes ago                                         deconz-latest
Identify Available Firmware Versions
This searches the docker log data, looking for if an updated firmware version exists. Change <container_id> to the container ID found in the step above.
If an output similar to this is found, there is a firmware version update needed and the firmware found is needed in the next steps.
docker logs <container_id> | grep 'GW update firmware found' | tail
20:46:34:253 GW update firmware found: /usr/share/deCONZ/firmware/deCONZ_ConBeeII_0x26660700.bin.GCF
Stop the deCONZ Container
The deCONZ Container Station image needs to be stopped before proceeding. This can be done in the QNAP web interface in the Container Station application by clicking the square icon to stop the server.
It can also be stopped via the command line with the docker command:
docker stop <container_id>Update the ConBee II Firmware via SSH
Run this docker command to initiate the firmware update. This starts a docker container that initiates the firmware update script (entrypoint). The script is interactive and will prompt for which device to update as well as which firmware version to apply.
docker run -it --rm --entrypoint "/firmware-update.sh" --privileged --cap-add=ALL -v /dev/:/dev -v /lib/modules:/lib/modules -v /sys:/sys deconzcommunity/deconzThis is an example of the interactive script that will run.
-------------------------------------------------------------------

             deconzcommunity/deconz Firmware Flashing Script

                       Version: 0.8

-------------------------------------------------------------------


Listing attached devices...

GCFFlasher V3_17 (c) dresden elektronik ingenieurtechnik gmbh
Path             | Vendor | Product | Serial     | Type
-----------------+--------+---------+------------+-------
/dev/ttyACM0     | 0x1CF1 | 0x0030  |            | ConBee II
/dev/ttyUSB0     | 0x0403 | 0x6015  |            | ConBee
/dev/ttyUSB1     | 0x0403 | 0x6015  |            | ConBee

Enter the full device path, or press Enter now to exit.

Device path .: /dev/ttyACM0

-------------------------------------------------------------------

Firmware available for flashing:
deCONZ_ConBeeII_0x26660700.bin.GCF
deCONZ_ConBeeII_0x26680700.bin.GCF
deCONZ_RaspBeeII_0x26690700.bin.GCF
deCONZ_Rpi_0x26350500.bin.GCF
deCONZ_Rpi_0x26390500.bin.GCF

Enter the firmware file name from above, including extension.
Alternatively, you may enter the name of a firmware file to download
from any of the following sources:
 - http://deconz.dresden-elektronik.de/deconz-firmware/         (stable)
 - http://deconz.dresden-elektronik.de/deconz-firmware/beta/    (beta)

If you wish to exit, just hit Enter.

Firmware file: deCONZ_ConBeeII_0x26660700.bin.GCF

-------------------------------------------------------------------

Device path .: /dev/ttyACM0
Firmware file: deCONZ_ConBeeII_0x26660700.bin.GCF
Timeout .....: 60

Are the above values correct?
Enter Y to proceed, any other entry to exit: y

Flashing...

GCFFlasher V3_17 (c) dresden elektronik ingenieurtechnik gmbh
Reboot device /dev/ttyACM0 (ConBee II)
deCONZ firmware version 26580700
R21B18 Bootloader
Vers: 2.07
build: Jun 17 2019
unlock!  (7527 ms)
flashing 164106 bytes: |==============================|
verify: .
SUCCESS
Wait 10 seconds until application starts
NOTE: When prompted for the Device path, an auto-filled 0 is on the command line that needs to be deleted before typing in the device path of the ConBee II device. If you don’t delete the 0, the firmware update will fail.
Start the deCONZ Container
Now that the firmware has been updated, the Container Station container should be started. This can be done via the QNAP web interface in the Container Station application.
It can also be started via the command line with the docker command:
docker start <container_id>Wait until the container has fully started before proceeding.
Confirm ConBee 2 Firmware has Been Updated
The firmware update should be complete. Login to the Phoscon App web interface to confirm that the update resolved the issue of the ConBee II device not being found.
Go back to the Gateway page by clicking on the hamburger menu in the top left and choose Gateway. The firmware version should now be listed on the Firmware row. This indicates that the deCONZ API is connected and communicating with the ConBee II device.

Add a Device in the Phoscon App Website Interface
- Login to Phoscon App
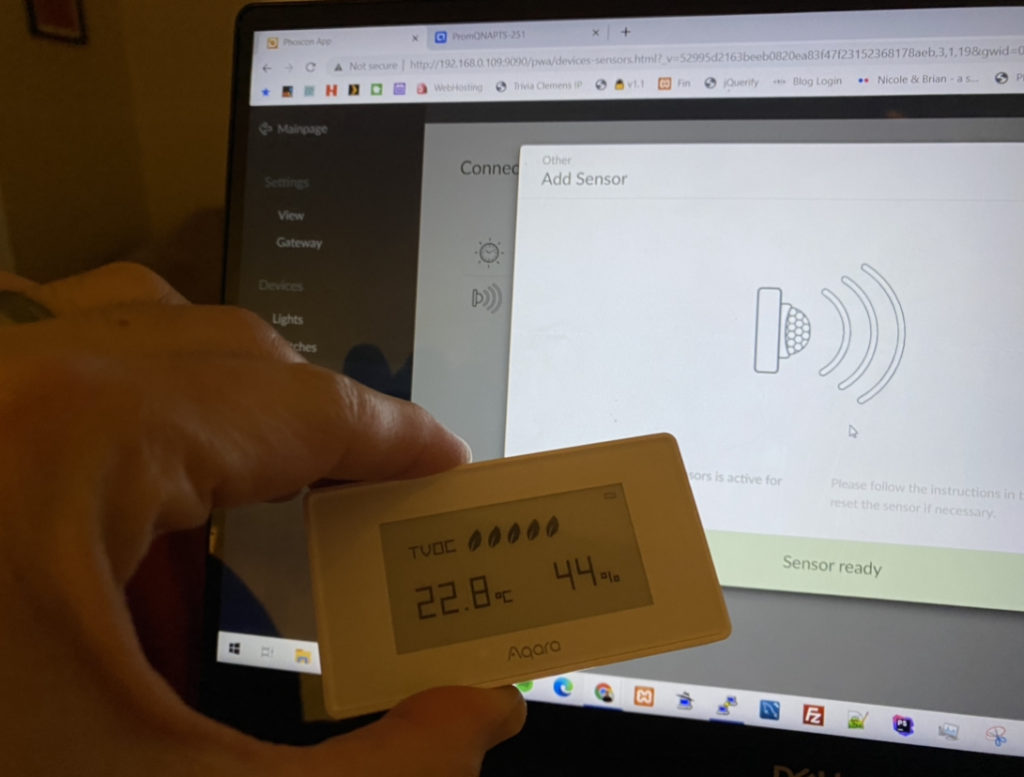
- Click on the three line hamburger menu in the top left and choose Sensors. Then click the Add new sensor button.

- On the Select vendor screen choose Other.

- Phoscon App is searching for a new sensor. Follow the device instructions for pairing devices.

- When the device is found a green bar at the bottom indicates Sensor ready.
Integrate deCONZ with Home Assistant
In Home Assistant, go to:
- Configuration -> Integrations
- Click the Add Integration button.
- Type
deCONZin the search box and click the result.

- A configuration screen comes up. Enter the IP address and port of the Phoscon deCONZ gateway (web application address). Click the Submit button.

- A screen of instructions displays instructing how to link to the deCONZ gateway.

- Log into the Phoscon App web application via the IP address and port.
- Click on the Hamburger menu, choose Gateway, and Advanced (bottom).
- Click the Authenticate app button. A countdown timer will begin. Before the timer runs out, switch back to Home Assistant and click the Submit button.


- Home Assistant should connect to deCONZ and show the Success screen. If not, try again until it connects.

Troubleshooting: IP Address Changed for deCONZ Server
This is a troubleshooting step for an established system – this step is not needed for the initial setup.
If the IP address of the deCONZ server has changed, Home Assistant will no longer know where to find deCONZ and thus the integration fails. Some may say that a solution to this issue is to delete the deCONZ Home Assistant integration and re-add it. But that introduces risk as all of the devices added, assigned to automations, etc. may get lost as well. There’s a better way – just update the IP address in the Home Assistant configuration! Sadly this isn’t available from within the Home Assistant web interface. So this needs to be done on the file system. The file can be edited through an SSH connection, but just saying SSH connection may scare some users. So this tutorial will show how to do this in the QNAP admin.
To do this though, you’ll need to know where the Home Assistant configuration files are stored. If Home Assistant is running on QNAP via Container Station, it’s likely in a directory like Container/homeassistant
- Login to the QNAP admin
- Open the Text Editor app
- Chose
File -> Openand select the.system/core.config_entriesfile in the Home Assistant configuration directory (ie.Container/homeassistant/.system/core.config_entries) - Change the old IP address in this file to the new IP address.
Ctrl+Fwill bring up a search box to help find it.
- Choose
File -> Saveto save the file - Go to the Home Assistant web interface
- Choose Developer Tools from the left hand menu
- Click the
Restartbutton on the YAML tab under the Check and Restart section - Wait for Home Assistant to reload
- Choose Settings from the left hand menu
- Click Devices & Services
- The deCONZ integration should now show with the updated IP address and state that it needs to be reconfigured. Keep this page open, but the deCONZ web admin needs to be opened first.
- Login to the deCONZ web admin
- Click on the hamburger in the top left and click on
Settings -> Gateway - Click on Advanced at the bottom
- In the Home Assistant web admin, click the Reconfigure button for the deCONZ integration
- In the deCONZ web admin, click on the Authenticate app button
- In the Home Assistant web admin, click the Submit link
After this sequence of steps deCONZ should now be successfully integrated into Home Assistant to the new IP address of the deCONZ server.
Access deCONZ Graphical Interface via VNC Viewer
deCONZ offers a graphical interface to view and monitor the Zigbee network. The VNC Viewer software is needed to access this part of deCONZ. The VNC Viewer software can be downloaded here.

Setup VNC Viewer Connection to deCONZ
- Open VNC Viewer software
- Click File -> New Connection
- In the VNC Server field enter IP address of the QNAP server and the VNC port configured in the Container Station Environment Settings section.
<your.ip.address.here>:<DECONZ_VNC_PORT>
- In the Name field use a recognizable like
deCONZ. - Click OK

- A list of VNC server connections is shown. Double click on the newly created server to connect. An authentication screen is shown. Use the password specified in the Container Station Environment Settings section.

ConBee III
This tutorial is focused only on the ConBee II, though at this time it is an outdated device as the ConBee 3 has been released. While not tested, this tutorial should work but requires one additional option to be added to the containers Environment variables.
DECONZ_BAUDRATE=115200[source: deCONZ Docker Container on GitHub]
Resources:
- Troubleshooting ConBee II Connection Issues
- deCONZ Docker Container: Firmware Update
- deCONZ Change Log
- deCONZ Docker Container on GitHub
- dresden elektronik Software
- Home Assistant deCONZ Integration
- Related Tutorials
