The needs of automation in Home Assistant changes throughout the day based on sunrise and sunset and that our human behaviors change accordingly. When the sunlight goes down, automating lighting is a godsend! Why get up and walk to the light switch when you’ve already reached for the doorknob or walked past a motion sensor in the hallway or stairwell.
The possibilities are endless on how this can be applied:
- You’re out playing basketball on the driveway and the garage door is open. The sun sets below the horizon and darkness is inevitable. Home Assistant notices the sun event and that the door is opened, and the homes exterior lights flip on – no interruption on the game!
- It’s early morning on garbage day and the bins need to be brought out to the curb. Open your front door, the exterior lights flip on and a safe path is light. The only downside – your neighbors may see you in your pajamas.
- It’s dark in your hallway at night and a light glow would be helpful to see the path way. A classic plugin night light only lights one spot where as a strip of LED lights can be strung to light the entire distance before sun sets.
Read on to learn some tips on how to setup home lighting automation that only triggers when the sun isn’t shedding the light we need. These are lessons learned from home automation implementations.
Contents
- 1 How to Automate Lighting with Home Assistant
- 2 Equipment Needed for Lighting Automation
- 3 Home Assistant Integrations for Lighting Automation
- 4 Lighting Automation Tutorial
- 4.1 Turn Lights ON before Sunrise when a sensor is Opened
- 4.2 Turn Lights OFF before Sunrise when a sensor is Closed
- 4.3 Turn Lights ON after Sunset when a sensor is Opened
- 4.4 Turn Lights OFF after Sunset when a sensor is Closed
- 4.5 Turn Lights OFF at Sunrise when a sensor is Open
- 4.6 Turn Lights ON at Sunset when a sensor is Open
- 4.7 Turn Lights ON at a Specific Time if Sunrise has not Occurred
- 4.8 Turn Lights OFF at Sunrise
- 5 Automation Customizations
- 6 Testing Automations
- 7 Lighting Automation Based on Luminance (light level)
How to Automate Lighting with Home Assistant
Home Assistant relies on many sensors to tell it what has happened. Without them, home automation can’t be very automated… A sensor is really just an indicator that something changed. Physical changes often are the first that come to mind – a light switch being turned on or a door contact sensor being separated and thus the door is open. But non-physical sensors exist as well such as is the sun above or below the horizon or what is the speed of the wind. This opens a large world of possibilities.
For the sake of this tutorial, both physical and non-physical sensors are required. A physical contact sensor paired with the sun sensor (integration) will be used to ensure lights are turned on and off at the appropriate times. A contact sensor could easily be swapped out for a motion sensor as well but will not be covered in this tutorial.
Equipment Needed for Lighting Automation
Contact Sensors
There are many manufactures of contact sensors that can be connected to Home Assistant through wired and wired methods and through various protocols (Zigbee, Zwave, WI-FI, Matter, etc.) This tutorial will not go into detail on all of those options. It will be based on the Aqara Contact Sensor connected via Zigbee. A tutorial on how to setup this sensor can be found in the Aqara Contact Sensors in Home Assistant without a Hub post.
Aqara contact sensors can be found on Amazon and other retailers.

Smart Light Switches
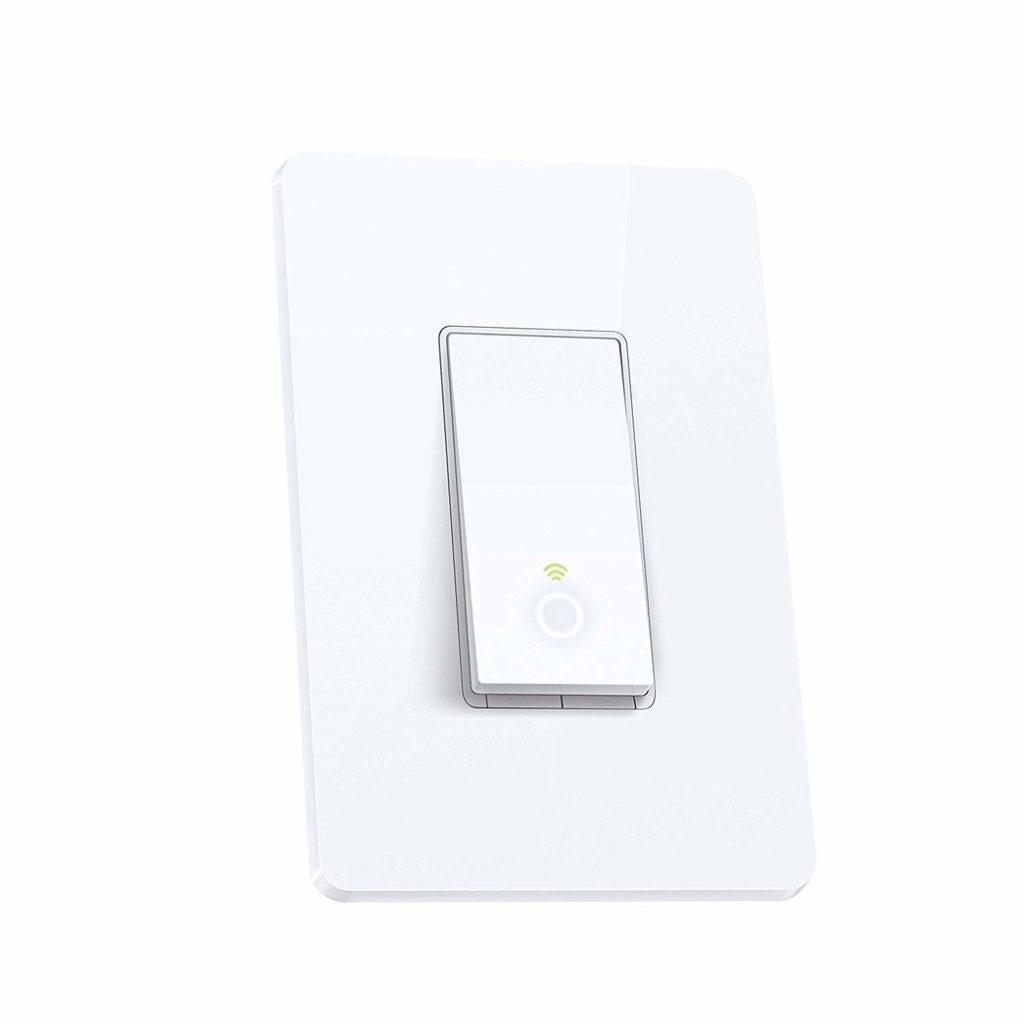
Replacing standard light switches with smart light switches allows for automation of lighting to be possible. Home Assistant will talk to the light switch, which will light the way to a better way of life. There are many options on the market and many of the major home wiring component companies like Lutron and Legrand Pass & Seymour offer WIFI smart switch options. The tp-link Kasa smart products are also top notch and get the recommendation here based on quality of product, array of product offerings by the brand, and price point.
The tp-link Kasa HS200 Smart Light Switch (single pole) is a quality option and works in most situations. There are many other options available of course, so be sure to find the correct switch for the application.
Smart Outlets
To automate things such as Christmas and holiday lights that are not typically controlled by a light switch, a smart outlet or plug is needed. These are awesome – a virtual switch is built into the outlet controlling when it is sending power. This unlocks so many options!
Smart Plugs are great because they are easy to use – plugin and configure to be used. No wiring is needed. They are great for holiday lights that will only be up for a short period of time. Outdoor options are available as well to ensure safety during the rainy and snowy periods.
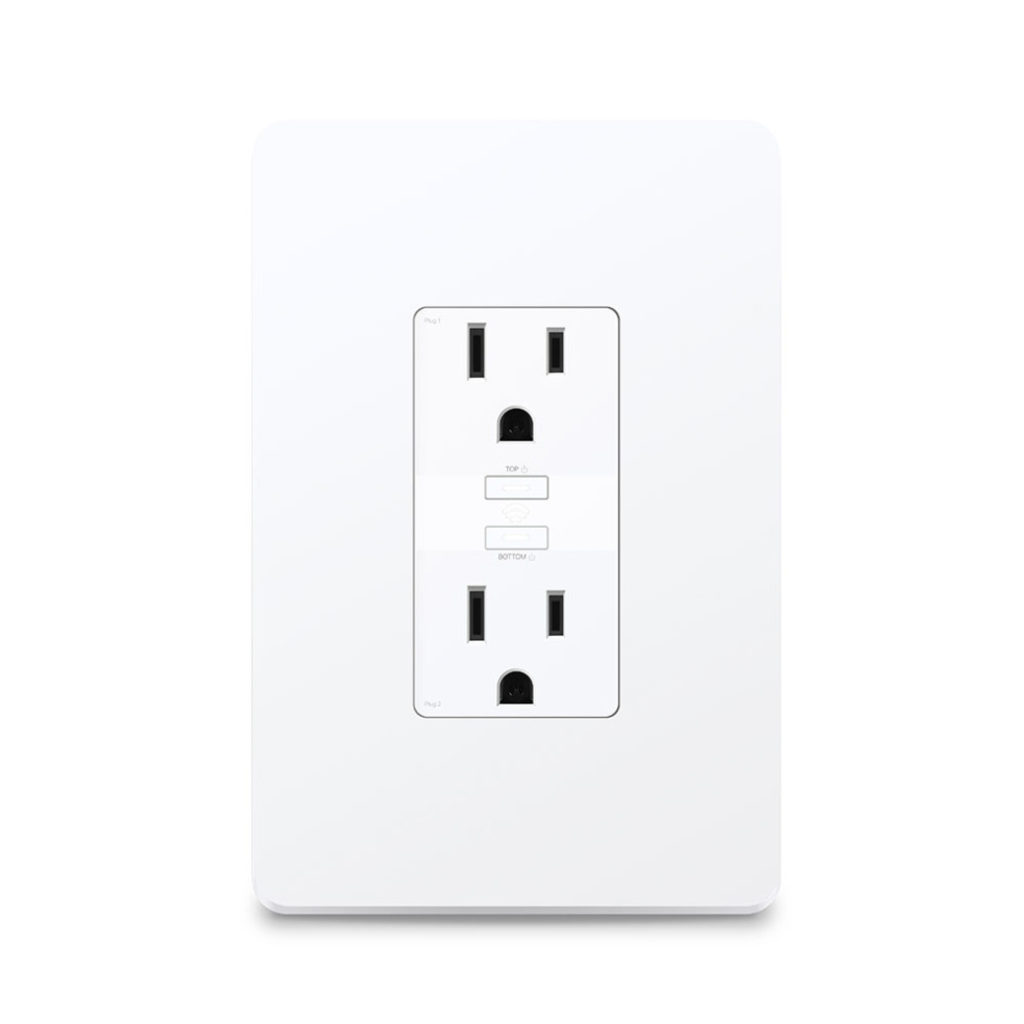
For more permanent installations a Smart Outlet may be a better choice. They are wired into the wall like any other outlet in the home. A big benefit over the smart plug is that there isn’t anything extra protruding from the wall giving a cleaner look and a bit of added safety.
Both the Smart Plugs and the Smart Outlets will typically have physical on/off buttons as well to allow for manual operation as well.
Smart Plug: Indoor
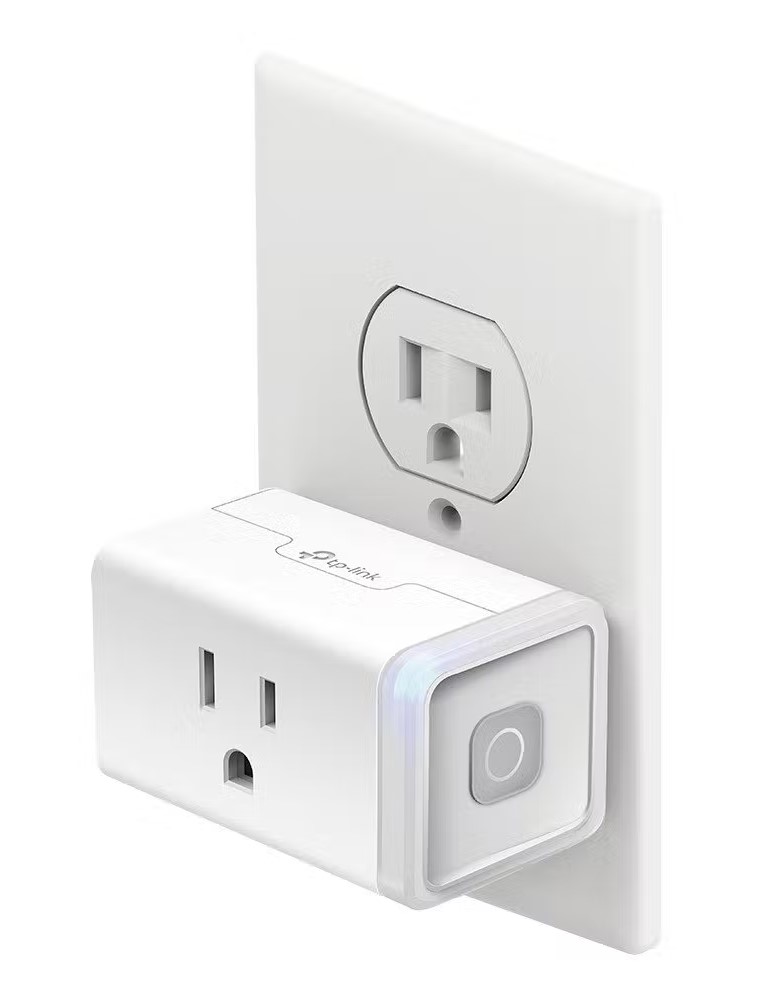
The tp-link Kasa HS103 is an indoor smart plug that includes a physical on/off button as well as an LED indicator (not very bright) to indicate the status of the plug. These devices are very reliable and just work. These smart plugs are sold in in packs of various quantiles. The 4 pack is a great mix of price and convenance – once you have one in action, you’ll find a need for more!
Smart Plug: Outdoor
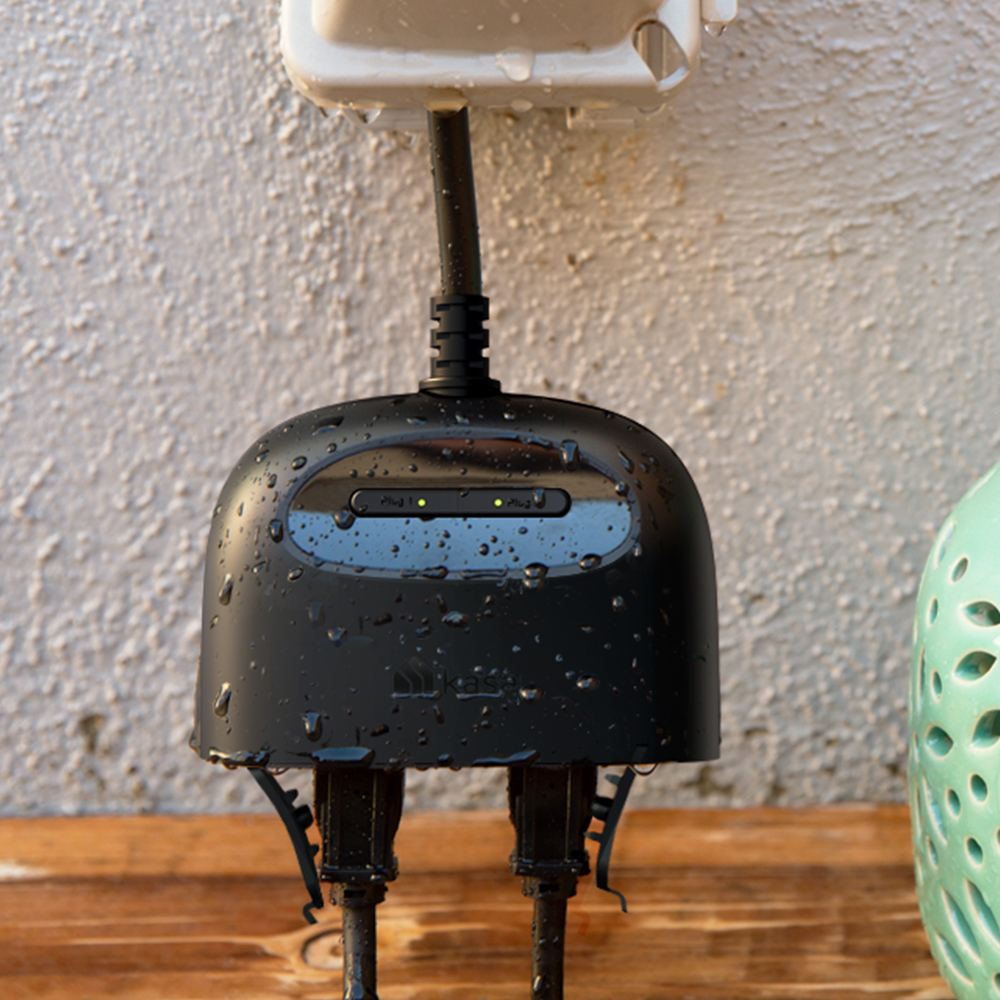
The tp-link Kasa EP40 outdoor smart plug is an AWESOME device. It includes 2 outlets that are independently controlled by either physical buttons or via WIFI. This is weatherproofed with an IP64 rating. Plug this in, set it up via the Kasa app, and NEVER question if it’s going to do what you expect of it.
Smart Outlet: Indoor
The tp-link Kasa KP200 is an indoor rated smart outlet. This will require wiring the device into the wall like any other outlet in the home – hiring a certified electrician is advised. Two individually controllable outlets via WIFI or physical buttons are packed into this one unit giving great flexibility.
Home Assistant Integrations for Lighting Automation
Integrations in Home Assistant are needed for each device that is connected. The integration creates communication between Home Assistant and the device. The Home Assistant Automation will talk to the Integration which knows how to communicate to the device correctly. The integration will create the Entities within Home Assistant. Once integrated, a device will have one more more entities, each of which function as independent sensors and controls.
There are many manufactures of smart devices, but not all of them have Home Assistant integrations. Before purchasing a device ensure an integration exists for it by checking the Home Assistant Integration Directory.
Sun Sensor Integration
Home Assistant comes with the built in Sun Integration that is extremely useful in creating automations. The Sun integration uses the location configured in Home Assistant to know when the sun is above or below the horizon. This built in integration is powerful and works well so no additional effort is needed to find a solution to this part of the automation puzzle.
The location of Home Assistant is configured at:
1 2 | Settings -> System -> General Click the <strong>Edit</strong> button in the <strong>Edit Location</strong> section |
Or a shortcut method it to go to:
1 | https://<url_to_home_assistant>/config/zone |
Contact Sensor Integration
Several manufactures offer contact sensors. Typically these are battery powered devices and given the higher energy usage of WIFI, they often do not use the WIFI protocol. Zigbee is a very common communication protocol for contact sensors, and Matter is quickly becoming the new standard. Covering how to setup Zigbee or Matter with each Home Assistant setup is out of scope of this tutorial. But this tutorial – Aqara Contact Sensors in Home Assistant without a Hub – covers one method to add a contact sensor.
Smart Light Switch Integration
A Home Assistant Integration will be needed for any smart light switches used. Each switch manufacturer will have their own integration that needs to be used.
The smart switch highlighted above in this tutorial does have a manufacturer supplied integration method for Home assistant – the TP-Link Kasa Smart integration.
Smart Plug and Outlet Integration
Just like other devices, there are many manufactures offering smart plugs and for that reason the integration used may vary. The smart plugs and outlets highlighted above in this tutorial use the TP-Link Kasa Smart Home Assistant integration.
Lighting Automation Tutorial
This tutorial covers how to automatically turn lights on and off based on the following conditions:
- Turn lights ON before Sunrise when a sensor is Opened
- Turn lights OFF before Sunrise when a sensor is Closed
- Turn lights ON after Sunset when a sensor is Opened
- Turn lights OFF after Sunset when a sensor is Closed
- Turn lights OFF at Sunrise when a sensor is in an Open state
- Turn lights ON at Sunset when a sensor is in an Open state
- Turn Lights ON at a Specific Time if Sunrise has not Occurred
- Turn Lights OFF at Sunrise
Several Home Assistant automations will need to be created to manage all of these different scenarios. It likely could be possible to merge these all into one automation, however that will make it difficult to manage and debug should any issues arise. And the sequence of rules gets more complex, thus the many automations will be a blessing in the long run.
Home Assistant automations can be edited via a visual editor or the yaml editor. This tutorial will reference how to build these automations using the visual editor as well as provide sample yaml code. Switching between the visual and yaml editor is simple in Home Assistant is easy and allows for both options to be used.
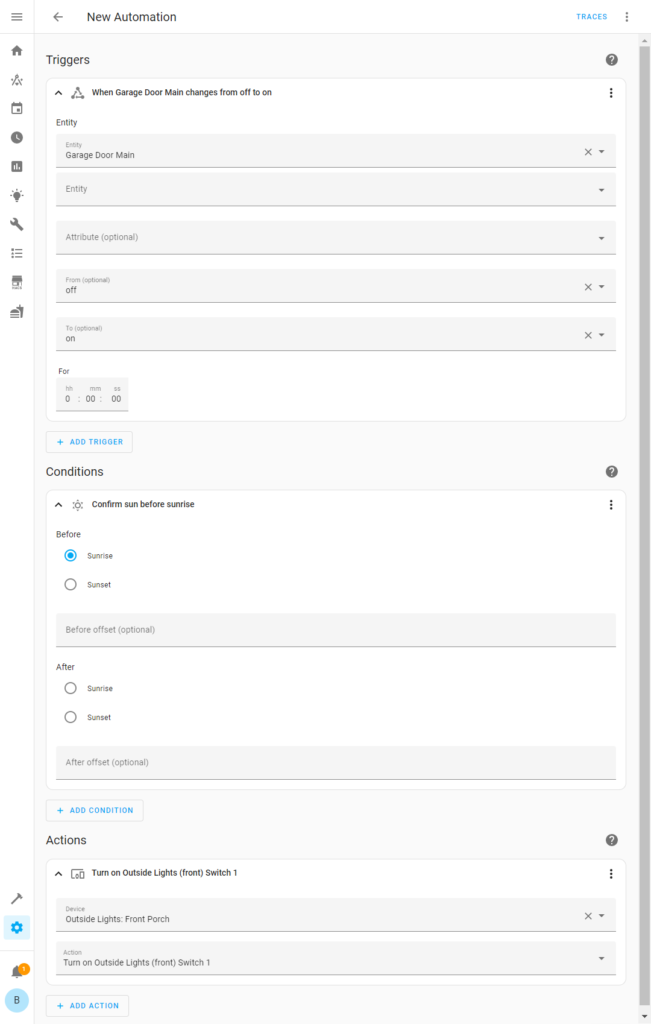
Turn Lights ON before Sunrise when a sensor is Opened
This automation is useful for ensuring lights are on when taking the garbage cans out in the morning, stepping out the mailbox to mail a letter in the morning, fetching the morning paper off the doorstep, etc.
- In Home Assistant, go to Settings -> Automations & Scenes
- Click the + CREATE AUTOMATION button
- Select Start with an empty automation option
- In the Triggers section:
- Click the + ADD TRIGGER button
- Select State from the dropdown
- In the Entity dropdown, select an entity that will trigger the lights to turn on
- A Contact Sensor attached to an entry or garage door is a great choice
- In the From box choose Closed
- NOTE:
off(all lowercase) is also acceptable
- NOTE:
- In the To box choose Open
- NOTE:
on(all lowercase) is also acceptable
- NOTE:
- If more than one sensor should trigger this automation, repeat these steps for each entity.
- In the Conditions section:
- Click the + ADD CONDITION button
- Select Sun from the dropdown
- Select the Before Sunrise option
- In the Actions section:
- Click the + ADD ACTION button
- Select Device from the dropdown
- In the Device dropdown select the smart switch, plug, or outlet that will be turned on
- In the Action dropdown select the Turn On option. (this may be worded slightly different per device)
- Click the SAVE button
- Enter a Name for this automation (example: Turn Lights On when Door Opens before Sunrise)
- Optional: Enter a Description
- Click the SAVE button
Visual Editor
yaml Configuration Example
1 2 3 4 5 6 7 8 9 10 11 12 13 14 15 16 17 | alias: Lights On when Door Opens Before Sunrise description: "" trigger: - platform: state entity_id: - binary_sensor.openclose_garagedoormain from: "off" to: "on" condition: - condition: sun before: sunrise action: - type: turn_on device_id: 0e5ab2998e8ab59a1a2f93c1954fae9a entity_id: switch.outside_lights_front_porch_switch_1 domain: switch mode: single |
Turn Lights OFF before Sunrise when a sensor is Closed
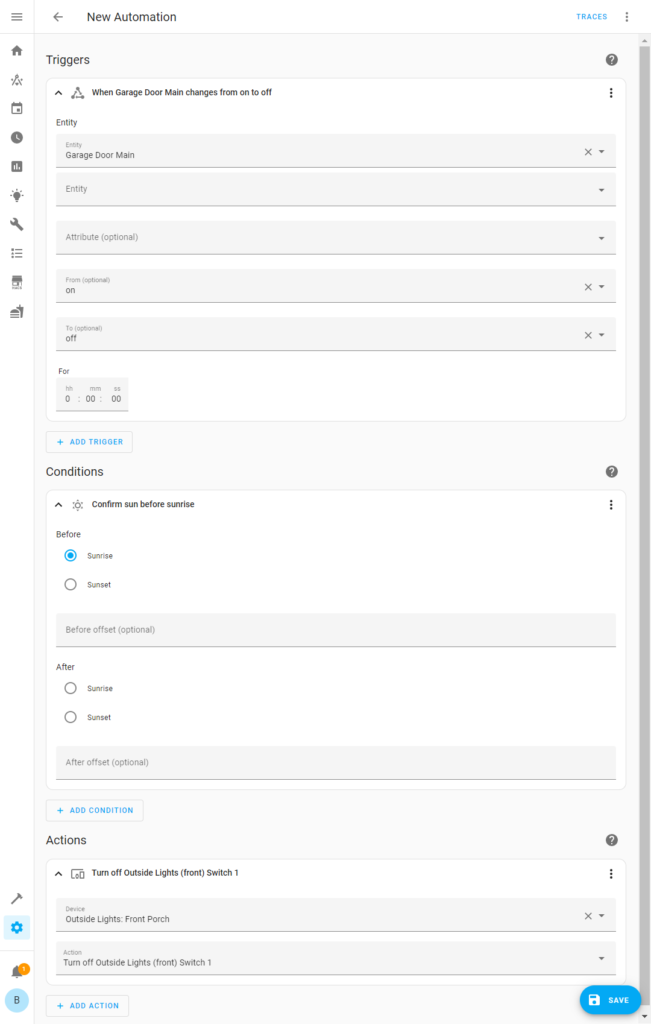
This automation is useful for ensuring lights are off when you are done with outside activities in the morning. The above automation turned the lights on when stepping out to get the morning paper (for example) and this will ensure that when you are back in the house the outdoor lights turn themselves off.
- In Home Assistant, go to Settings -> Automations & Scenes
- Click the + CREATE AUTOMATION button
- Select Start with an empty automation option
- In the Triggers section:
- Click the + ADD TRIGGER button
- Select State from the dropdown
- In the Entity dropdown, select an entity that will trigger the lights to turn on
- A Contact Sensor attached to an entry or garage door is a great choice
- In the From box choose Open
- NOTE:
on(all lowercase) is also acceptable
- NOTE:
- In the To box choose Closed
- NOTE:
off(all lowercase) is also acceptable
- NOTE:
- If more than one sensor should trigger this automation, repeat these steps for each entity.
- In the Conditions section:
- Click the + ADD CONDITION button
- Select Sun from the dropdown
- Select the Before Sunrise option
- In the Actions section:
- Click the + ADD ACTION button
- Select Device from the dropdown
- In the Device dropdown select the smart switch, plug, or outlet that will be turned on
- In the Action dropdown select the Turn Off option. (this may be worded slightly different per device)
- Click the SAVE button
- Enter a Name for this automation (example: Turn Lights Off when Door Closes before Sunrise)
- Optional: Enter a Description
- Click the SAVE button
Visual Editor
yaml Configuration Example
1 2 3 4 5 6 7 8 9 10 11 12 13 14 15 16 17 | alias: Lights Off when Door Closes Before Sunrise description: "" trigger: - platform: state entity_id: - binary_sensor.openclose_garagedoormain from: "on" to: "off" condition: - condition: sun before: sunrise action: - type: turn_off device_id: 0e5ab2998e8ab59a1a2f93c1954fae9a entity_id: switch.outside_lights_front_porch_switch_1 domain: switch mode: single |
Turn Lights ON after Sunset when a sensor is Opened
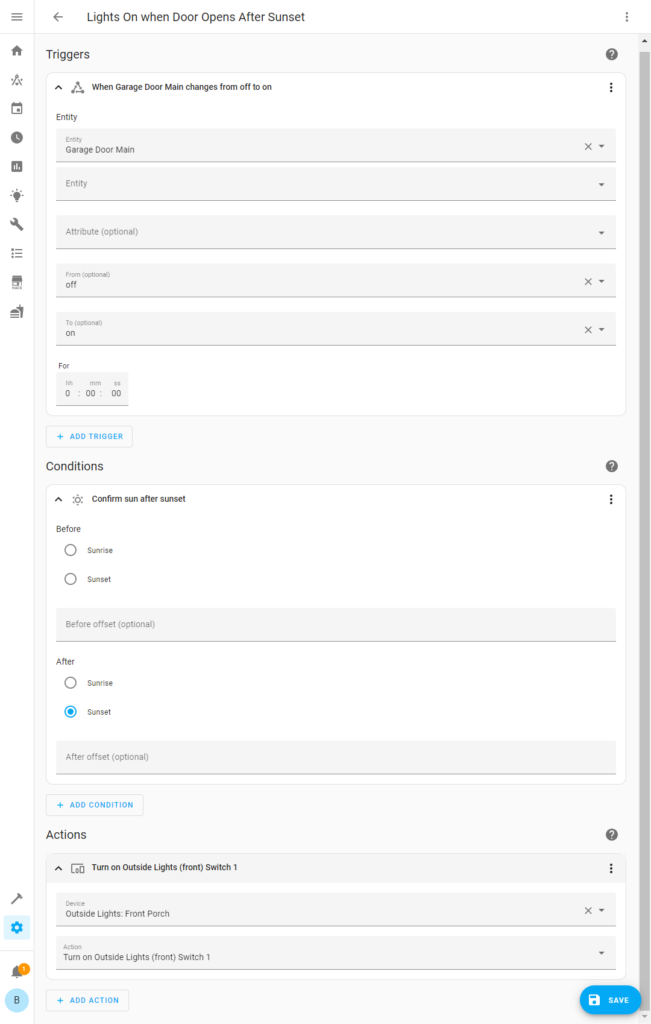
This automation is useful for ensuring lights are on when going out to get the mail after coming home from work, taking a gift to the neighbors, or going out to grab something out of the car in the driveway at night.
- In Home Assistant, go to Settings -> Automations & Scenes
- Click the + CREATE AUTOMATION button
- Select Start with an empty automation option
- In the Triggers section:
- Click the + ADD TRIGGER button
- Select State from the dropdown
- In the Entity dropdown, select an entity that will trigger the lights to turn on
- A Contact Sensor attached to an entry or garage door is a great choice
- In the From box choose Closed
- NOTE:
off(all lowercase) is also acceptable
- NOTE:
- In the To box choose Open
- NOTE:
on(all lowercase) is also acceptable
- NOTE:
- If more than one sensor should trigger this automation, repeat these steps for each entity.
- In the Conditions section:
- Click the + ADD CONDITION button
- Select Sun from the dropdown
- Select the After Sunset option
- In the Actions section:
- Click the + ADD ACTION button
- Select Device from the dropdown
- In the Device dropdown select the smart switch, plug, or outlet that will be turned on
- In the Action dropdown select the Turn On option. (this may be worded slightly different per device)
- Click the SAVE button
- Enter a Name for this automation (example: Turn Lights On when Door Opens After Sunset)
- Optional: Enter a Description
- Click the SAVE button
Visual Editor
yaml Configuration Example
1 2 3 4 5 6 7 8 9 10 11 12 13 14 15 16 17 | alias: Lights On when Door Opens After Sunset description: "" trigger: - platform: state entity_id: - binary_sensor.openclose_garagedoormain from: "off" to: "on" condition: - condition: sun after: sunset action: - type: turn_on device_id: 0e5ab2998e8ab59a1a2f93c1954fae9a entity_id: switch.outside_lights_front_porch_switch_1 domain: switch mode: single |
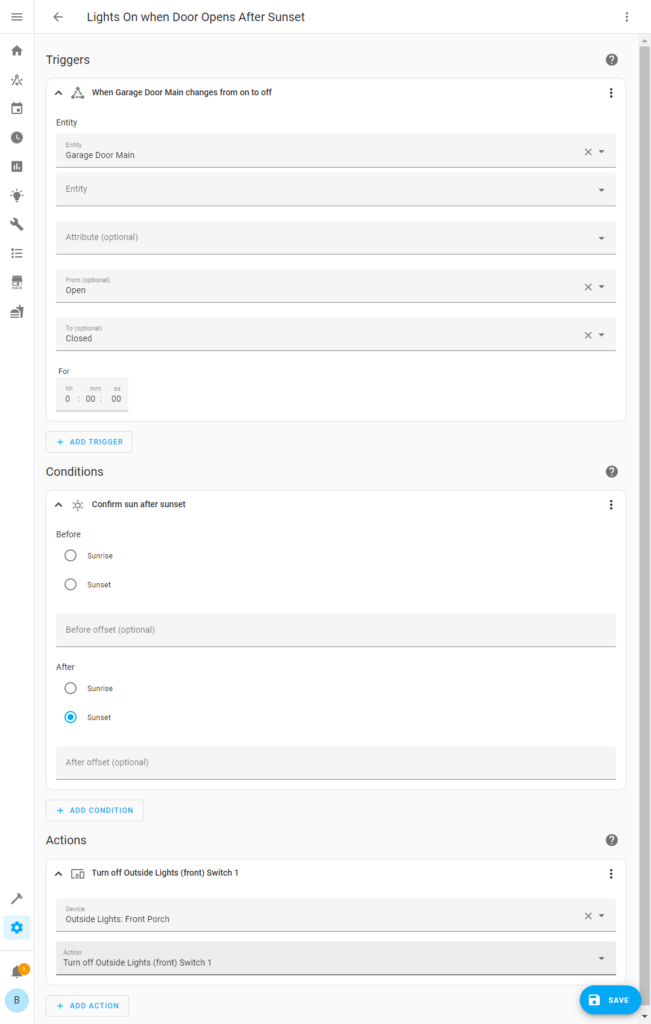
Turn Lights OFF after Sunset when a sensor is Closed
This automation is useful for ensuring lights are off when coming back into the house after sunset. There’s no need to have the lights on all night after grabbing the mail or saying high to the neighbors.
- In Home Assistant, go to Settings -> Automations & Scenes
- Click the + CREATE AUTOMATION button
- Select Start with an empty automation option
- In the Triggers section:
- Click the + ADD TRIGGER button
- Select State from the dropdown
- In the Entity dropdown, select an entity that will trigger the lights to turn on
- A Contact Sensor attached to an entry or garage door is a great choice
- In the From box choose Open
- NOTE:
on(all lowercase) is also acceptable
- NOTE:
- In the To box choose Closed
- NOTE:
off(all lowercase) is also acceptable
- NOTE:
- If more than one sensor should trigger this automation, repeat these steps for each entity.
- In the Conditions section:
- Click the + ADD CONDITION button
- Select Sun from the dropdown
- Select the After Sunset option
- In the Actions section:
- Click the + ADD ACTION button
- Select Device from the dropdown
- In the Device dropdown select the smart switch, plug, or outlet that will be turned on
- In the Action dropdown select the Turn Off option. (this may be worded slightly different per device)
- Click the SAVE button
- Enter a Name for this automation (example: Turn Lights Off when Door Closes After Sunset)
- Optional: Enter a Description
- Click the SAVE button
Visual Editor
yaml Configuration Example
1 2 3 4 5 6 7 8 9 10 11 12 13 14 15 16 17 | alias: Lights Off when Door Closes After Sunset description: "" trigger: - platform: state entity_id: - binary_sensor.openclose_garagedoormain from: "on" to: "off" condition: - condition: sun after: sunset action: - type: turn_off device_id: 0e5ab2998e8ab59a1a2f93c1954fae9a entity_id: switch.outside_lights_front_porch_switch_1 domain: switch mode: single |
Turn Lights OFF at Sunrise when a sensor is Open
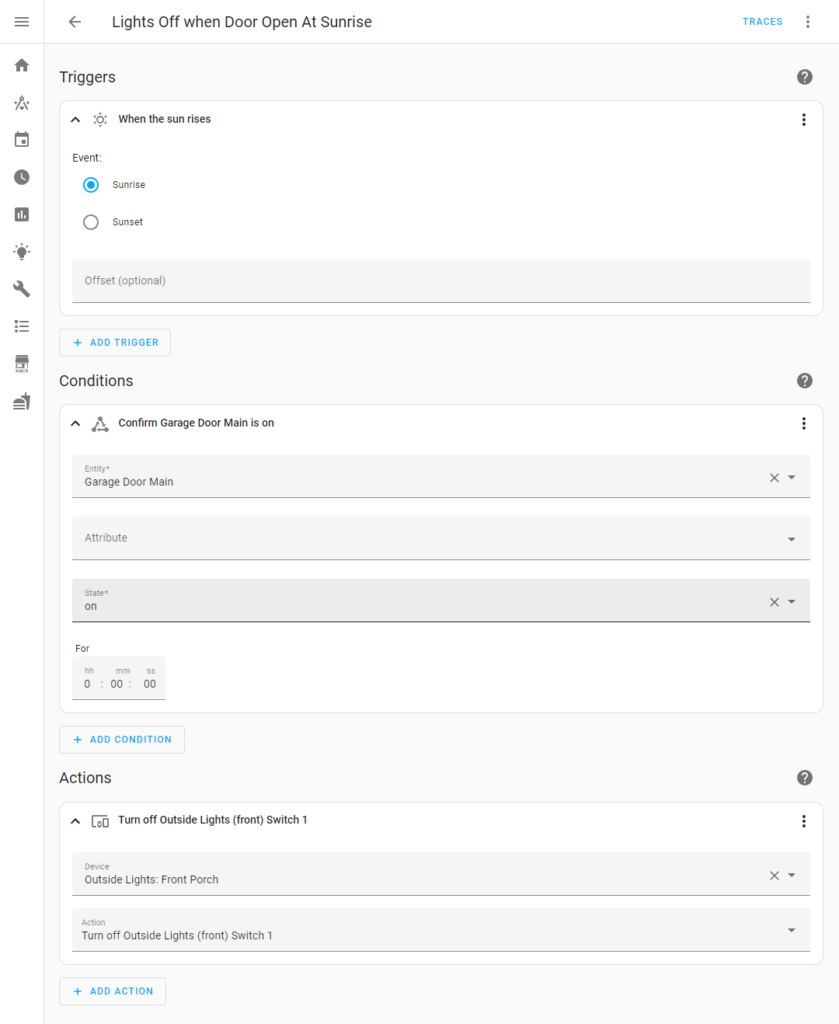
This automation is useful for ensuring lights are off when a sensor is opened AND sunrise occurs. Though you’ve stepped outside to take the garbage out, then realized you have dog droppings to clean up, and pick up some sticks, and before you know it a 2 minute task turned into 30 minutes. If the sun rose in that time and is providing enough light, why keep the outside lights on? Home Assistant can detect this situation and save the electricity by turning the lights off.
- In Home Assistant, go to Settings -> Automations & Scenes
- Click the + CREATE AUTOMATION button
- Select Start with an empty automation option
- In the Triggers section:
- Click the + ADD TRIGGER button
- Select Sun from the dropdown
- In the Event section, select Sunrise
- In the Conditions section:
- Click the + ADD CONDITION button
- Select State from the dropdown
- In the Entity dropdown, select an entity that will trigger the lights to turn on
- A Contact Sensor attached to an entry or garage door is a great choice
- In the State box choose Open
- NOTE:
on(all lowercase) is also acceptable
- NOTE:
- If more than one sensor should trigger this automation, repeat these steps for each entity.
- In the Actions section:
- Click the + ADD ACTION button
- Select Device from the dropdown
- In the Device dropdown select the smart switch, plug, or outlet that will be turned on
- In the Action dropdown select the Turn Off option. (this may be worded slightly different per device)
- Click the SAVE button
- Enter a Name for this automation (example: Turn Lights Off when Door Open At Sunrise)
- Optional: Enter a Description
- Click the SAVE button
Visual Editor
yaml Configuration Example
1 2 3 4 5 6 7 8 9 10 11 12 13 14 15 16 | alias: Lights Off when Door Open At Sunrise description: "" mode: single trigger: - platform: sun event: sunrise offset: 0 condition: - condition: state entity_id: binary_sensor.openclose_garagedoormain state: "on" action: - type: turn_off device_id: 0e5ab2998e8ab59a1a2f93c1954fae9a entity_id: switch.outside_lights_front_porch_switch_1 domain: switch |
Turn Lights ON at Sunset when a sensor is Open
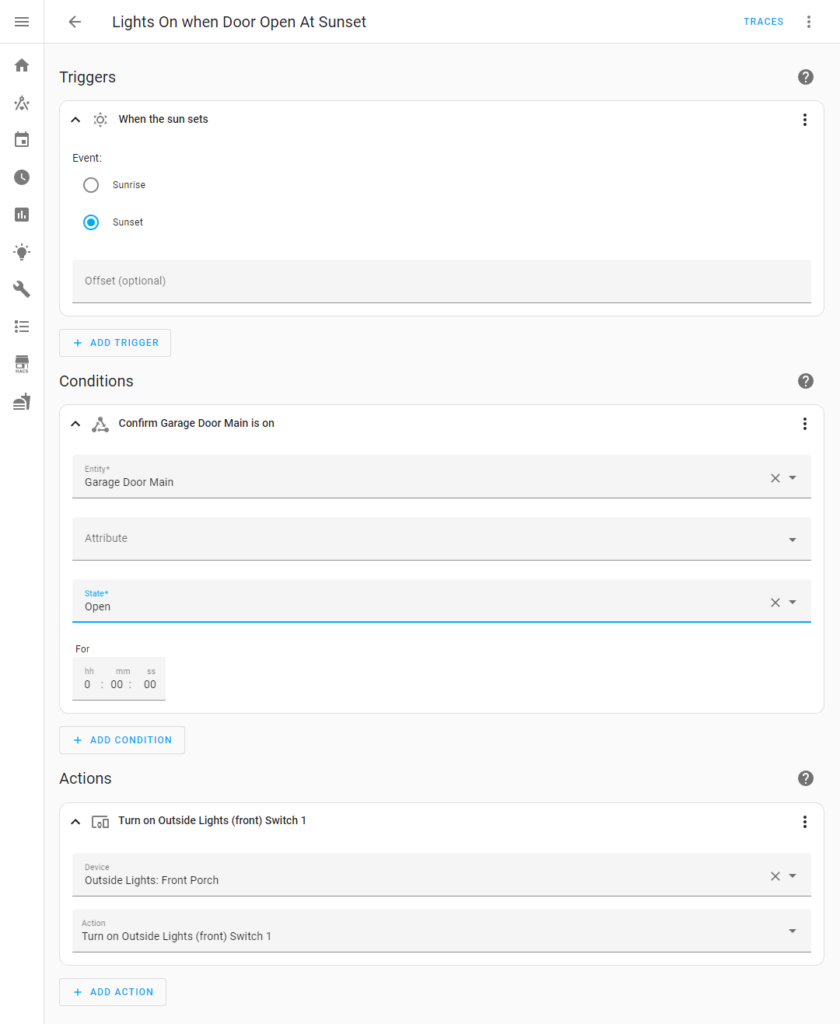
This automation is useful for ensuring lights turn on when a sensor is opened AND sunset occurs. Here’s a perfect scenario – you and the kids are out playing basketball on the driveway and the sun sets. Since the garage door is open, Home Assistant knows that you’re on the driveway and thus should provide the light needed to continue the game. So turn the lights on and give your kids a fair chance to beat you!
- In Home Assistant, go to Settings -> Automations & Scenes
- Click the + CREATE AUTOMATION button
- Select Start with an empty automation option
- In the Triggers section:
- Click the + ADD TRIGGER button
- Select Sun from the dropdown
- In the Event section, select Sunset
- In the Conditions section:
- Click the + ADD CONDITION button
- Select State from the dropdown
- In the Entity dropdown, select an entity that will trigger the lights to turn on
- A Contact Sensor attached to an entry or garage door is a great choice
- In the State box choose Open
- NOTE:
on(all lowercase) is also acceptable
- NOTE:
- If more than one sensor should trigger this automation, repeat these steps for each entity.
- In the Actions section:
- Click the + ADD ACTION button
- Select Device from the dropdown
- In the Device dropdown select the smart switch, plug, or outlet that will be turned on
- In the Action dropdown select the Turn On option. (this may be worded slightly different per device)
- Click the SAVE button
- Enter a Name for this automation (example: Turn Lights On when Door Open At Sunset)
- Optional: Enter a Description
- Click the SAVE button
Visual Editor
yaml Configuration Example
1 2 3 4 5 6 7 8 9 10 11 12 13 14 15 16 | alias: Lights On when Door Open At Sunset description: "" trigger: - platform: sun event: sunset offset: 0 condition: - condition: state entity_id: binary_sensor.openclose_garagedoormain state: "on" action: - type: turn_on device_id: 0e5ab2998e8ab59a1a2f93c1954fae9a entity_id: switch.outside_lights_front_porch_switch_1 domain: switch mode: single |
Turn Lights ON at a Specific Time if Sunrise has not Occurred
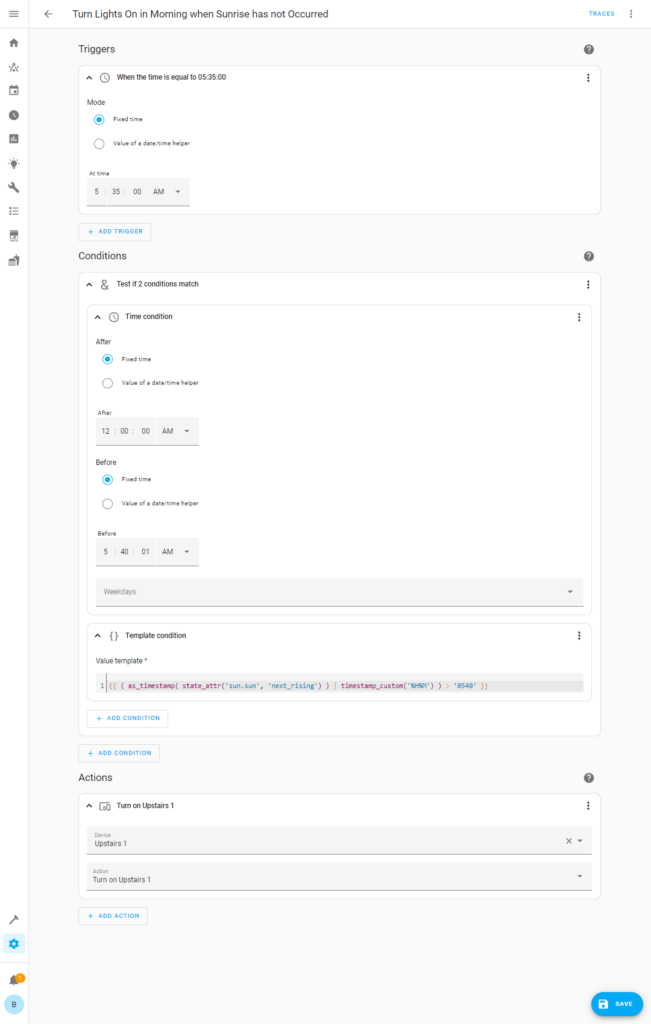
When waking up in the morning it’s nice to have lights on to light the way through a dark hallway. If you turn the light switch on, you then need to turn it off at a later time… so a set of strip lights or fairy lights controlled via WIFI with a smart plug or outlet is a nice choice here. Additionally the brightness of the lights can often be adjusted thus giving some ambient light without blinding you early in the morning.
The tricky part here though is that it may not make sense to turn these lights on if Sunrise has already occurred. So the automation needs to detect if Sunrise has happened or not when a time trigger should run the automation.
- In Home Assistant, go to Settings -> Automations & Scenes
- Click the + CREATE AUTOMATION button
- Select Start with an empty automation option
- In the Triggers section:
- Click the + ADD TRIGGER button
- Select Time from the dropdown
- In the Mode section, select Fixed time
- Set a specific time that the lights should turn on.
- Example: when your morning wake up alarm goes off
- In the Conditions section:
- Click the + ADD CONDITION button
- Select & And from the dropdown
- Click the + ADD CONDITION button under the Test if multiple conditions match section that was just added
- Select Time from the dropdown
- In the After section:
- Select Fixed time
- Set the starting time range that this automation should be allowed to run. Since this will be a morning automation setting it to
12:00:00 amor later, but before the fixed time set in the Triggers section is acceptable.
- In the Before section:
- Select Fixed time
- Set the ending time range that this automation should be allowed to run. This needs to be after the time set in the Triggers section above.
- Click the + ADD CONDITION button under the Test if multiple conditions match section
- Select {} Template from the dropdown
- Enter this template code into the Value template input field:
{{ ( as_timestamp( state_attr('sun.sun', 'next_rising') ) | timestamp_custom('%H%M') ) > '0535' }}- Edit this template code, replacing
0535with the time specified in the Triggers section above.- This value is in the
HHMMformat.HH= Hour in 24 hour time format with leading zero for numbers under 10MM= Minutes with leading zero
- This value is in the
- In the Actions section:
- Click the + ADD ACTION button
- Select Device from the dropdown
- In the Device dropdown select the smart switch, plug, or outlet that will be turned on
- In the Action dropdown select the Turn On <Device Name> option. (this may be worded slightly different per device)
- Click the SAVE button
- Enter a Name for this automation (example: Turn Lights On in Morning when Sunrise has not Occurred)
- Optional: Enter a Description
- Click the SAVE button
Visual Editor
yaml Configuration Example
1 2 3 4 5 6 7 8 9 10 11 12 13 14 15 16 17 18 19 20 21 22 | alias: Turn Lights On in Morning when Sunrise has not Occurred description: "" trigger: - platform: time at: "05:35:00" condition: - condition: and conditions: - condition: time before: "05:40:01" after: "00:00:00" - condition: template value_template: >- {{ ( as_timestamp( state_attr('sun.sun', 'next_rising') ) | timestamp_custom('%H%M') ) > '0540' }} action: - type: turn_on device_id: ecd3a7346a0c48fca719b94bb1c0779d entity_id: switch.upstairs_1 domain: switch mode: single |
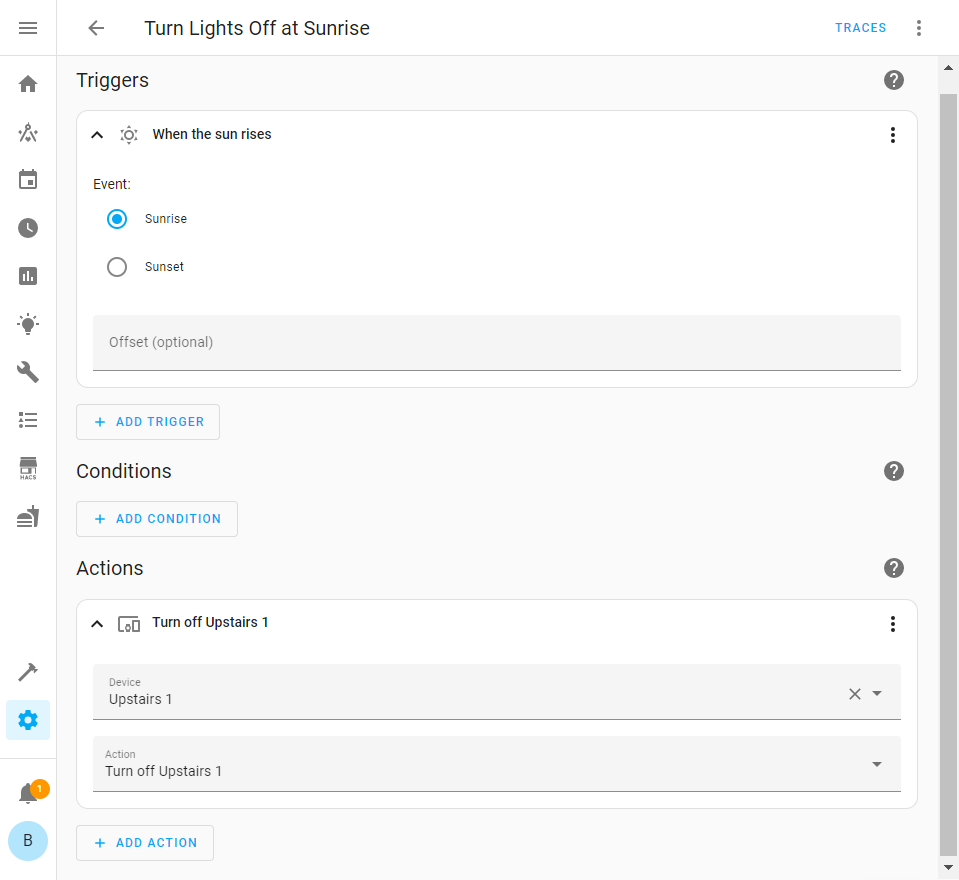
Turn Lights OFF at Sunrise
This automation is rather basic – about as simple as it can get. It’s the automation that will ensure the lights are turned off from the Turn Lights ON at a Specific Time if Sunrise has not Occurred automation. It can be used in many other situations as well.
- In Home Assistant, go to Settings -> Automations & Scenes
- Click the + CREATE AUTOMATION button
- Select Start with an empty automation option
- In the Triggers section:
- Click the + ADD TRIGGER button
- Select Sun from the dropdown
- In the Event section, select Sunrise
- In the Actions section:
- Click the + ADD ACTION button
- Select Device from the dropdown
- In the Device dropdown select the smart switch, plug, or outlet that will be turned on
- In the Action dropdown select the Turn Off <Device Name> option. (this may be worded slightly different per device)
- Click the SAVE button
- Enter a Name for this automation (example: Turn Lights Off at Sunrise)
- Optional: Enter a Description
- Click the SAVE button
Visual Editor
yaml Configuration Example
1 2 3 4 5 6 7 8 9 10 11 12 13 | alias: Turn Lights Off at Sunrise description: "" trigger: - platform: sun event: sunrise offset: 0 condition: [] action: - type: turn_off device_id: ecd3a7346a0c48fca719b94bb1c0779d entity_id: switch.upstairs_1 domain: switch mode: single |
Automation Customizations
Trigger State Durations in Home Assistant Automations
When configuring the triggers, they can be customized to only trigger after the state has been active for a specified amount of time. By default it’s set to 0 for all triggers. But if the automation shouldn’t run unless the door has been opened for at least 5 minutes (for example) change the For option to 0:05:00. With this set, the automation won’t be triggered unless the sensor has been in the desired state for 5 minutes.

Sunrise and Sunset Offsets in Home Assistant Automations
Home Assistant offers offsets for sunrise and sunset automations. This can be useful in that at those events it might not be all that dark/light yet, but 30 minutes later it is. Or you really like to ensure the lights are before the sunset occurs. This is where offsets are used. A positive or negative number of minutes can be input here.
Examples:
- Negative Offset
- Sunset: 6:00pm
- Offset:
-45 - Triggered at: 5:15pm
- Positive Offset:
- Sunrise: 5:15am
- Offset: 20
- Triggered at: 5:35am
Testing Automations
Creating the automation is a rather easy task once you understand what the options are and how they should work. That said, there are times that they don’t function as expected. Or you just want the peace of mind that it’ll function as expected but don’t want to wait until the sun event occurs, find out it didn’t work, and then wait until tomorrow to see if it works. That’s why Home Assistant added methods to test automations as needed.
Manually Run Actions
From the Automations grid or view/edit page, click the three vertical dots and choose the Run option

This will just run the Actions and the Conditions and Triggers will be essentially ignored.
The Traces option from the three vertical dots menu will provide more detailed information about what the automation did. The Trace Timeline tab shows what steps were run at what time.

The downside to this testing is that it’s only testing the Actions. This doesn’t allow for proper testing of the Triggers or Conditions. Depending on the automation, this may not be an issue. And in the case of the examples in this tutorial, this may be sufficient testing. But if testing of the Triggers or Conditions is needed, read on for how to simulate events.
Simulate Events
To test an automation, the state of the sensors needs to be set correctly for the automation to trigger. Rather than wait for the stars (in this case the sun) to properly align, it’s helpful to just set them to the necessary states. This simulation method will temporarily and virtually set the state values. This will not alter the actual state of the device (example: will not turn on a light) but related automations will trigger.
To simulate events in Home Assistant
- Go to
Developer Tools - Click the
Statestab at the top - Click the Set State text to expand this section
- In the Entity select the entity you’d like to change the state of
- In the State field type in the state input box
- Click the SET STATE button
An example of how to use this is to change the state of a contact sensor that is currently Closed to Open. To do this, set the state to on (all lower case) to simulate the sensor opening. This process all automations. If this change matches the Trigger of an automation, and the Conditions are all met, then the Actions of the automation will run.
Lighting Automation Based on Luminance (light level)
Basing automations off of the suns position has large value. The above examples work great for outdoor situations. For indoor lighting there are some other considerations however. At times sunrise has officially occurred but it’s a cloudy day, it’s raining, etc. In these situations, the sunrise event is a false indicator as it’s still too dark inside and thus you may be left in the dark. How can this scenario be accounted for? By adding a sensor that measures the luminance, that’s how.
Luminance – typically measured in Lux, Lumens, or Candelas – is a measurement of light. One way to measure luminance in Home Assistant is highlighted in related tutorial Aqara Motion Sensor in Home Assistant without a Hub a motion sensor is used that also can measure luminance in Lux. Automations could be created to ensure lights are on when the Lux rating is below 20 Lux (as an example).


