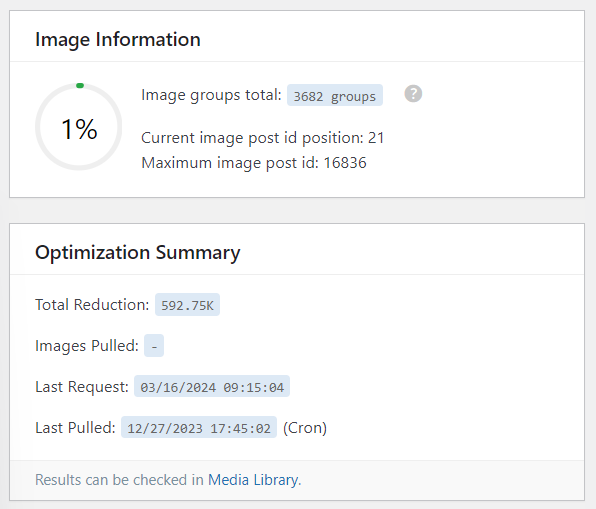
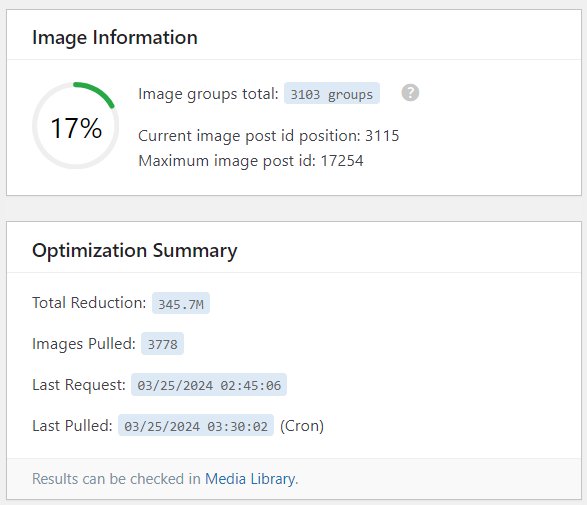
I struggled for several months with getting image optimization through LiteSpeed to pull .webp versions of my WordPress sites images down from QUIC.cloud. With my initial setup it worked as expected. And then stopped. Why? I finally figured out what the issue was, and I am now successfully getting .webp images to pull down from the QUIC.cloud CDN. I wanted to share my success story with you in hopes that it can help with your struggles as well!
Upon initial setup, it is advised to manually click the Send Optimization Request and Pull Images buttons in the WordPress admin on the LiteSpeed plugins Image Optimization page. I did that and it seemed to be working. From there the WordPress cron system (scheduled tasks) should take over and essentially run these buttons for you every 15 minutes (up to 200 images per day). This is the part where I started experiencing issues.
Day after day, the percentage of images processed would not change. Yet there were no errors in the log files. If I attempted to manually click the buttons, a success message would say that it successfully added the images to an async process. (async meaning it’ll run in the background) Yet the percentage of images completed would never update.

Contents
Setup Overview
- WordPress (v6.4.3)
- Hostinger Cloud website hosting
- LiteSpeed WordPress Plugin (v6.1)
- Configured based on this Hostinger LiteSpeed Tutorial
- QUIC.cloud account
- Cloudflare
What is QUIC.cloud
QUIC.cloud is a CDN service that offers a whole host of optimization services that can aid in boosting website performance. This includes page optimization, critical CSS generation, caching, and – in the case of this discussion – Image Optimization. They offer some free services (at times up to a threshold) as well as paid services. QUIC.cloud‘s host of services and global network of servers offer many benefits to boosting page load times of WordPress sites.
How to fix Optimized Images Not Pulling Into WordPress from QUIC.cloud
After a lot of debugging and trial and error I found the root of the issue. I had added an IP restriction directive to a .htaccess file in the wp-admin/ directory to block undesired visits to the WordPress admin. However, the .htaccess directive did not include the webservers IP address which – is needed since the LiteSpeed WordPress cron request calls the server itself.
https://www.example.com/wp-admin/admin-ajax.php?action=async_litespeed&nonce=34be8c0f1c&litespeed_type=imgoptm_force
Because the webservers IP was blocked by the .htaccess directive, a status code of 403 Forbidden was returned by the webserver. The way LiteSpeed built their plugin, it uses async logic. When the Pull Images button is clicked or it’s action is called by the cron, the process to pull images from QUIC.cloud to the WordPress server is queued up to run in the background. The request to trigger the queue technically succeeds given how the WordPress wp_remote_post() function works for async requests. Thus no error are returned to the user at this time. Then when the async process runs it fails silently due to the 403 status code.
In my case the issue was from a 403 due to an IP restriction in .htaccess. But there could be several other reasons that a 403 status code is returned and thus this same failure occurs. LiteSpeed has outlined the other reasons in their 403 Error Debugging Guide
.htaccess Directives that Caused a 403 Status Code for LiteSpeed QUIC.cloud Image Optimization
Initially I was using this directive in the file wp-admin/.htaccess to restrict access to the WordPress Admin for non-whitelisted IP addresses.
1 2 3 4 5 | <LIMIT GET> order deny,allow deny from all allow from 123.45.67.890 # office IP address </LIMIT> |
The first flaw noticeable here is that this does not include the webservers IP address. Additionally, in hindsight after doing some additional research on Apache .hataccess directives, this isn’t all that good of a restriction as it does nothing for POST or other methods. To address both of those concerns, this is the directive I’m not using that resolves both of these issues.
1 2 3 4 5 6 7 8 9 10 11 12 13 14 15 | <LimitExcept GET POST PUT OPTIONS> <LIMIT GET> order deny,allow deny from all allow from 987.65.432 # Webserver IP address allow from 123.45.67.890 # office IP address </LIMIT> <LIMIT POST> order deny,allow deny from all allow from 987.65.432 # Webserver IP address allow from 123.45.67.890 # office IP address </LIMIT> </LimitExcept> |
The LimitExcept directive says that all are limited with the exception of the listed methods. Then the LIMIT directive defines how to handle specific methods. In this case, deny from all but those IP addresses specifically allowed.
Validating that Images are Pulling from QUIC.cloud to WordPress Server
There were several ways to validate that things were finally working after the change was applied. Keep in mind that the image optimization process runs in a queue and processes 200 images per day. Thus this validation process will take a bit of time to ensure all is working as it should.
Image Optimization Percentage and Count in WordPress Admin
In the WordPress admin, go to LiteSpeed Cache -> Image Optimization and monitor the percentage and count in the Image Information section. This number should of course grow over time up to 100% (though if you continue to add images to the WordPress site the percentage growth may be skewed a bit).


Media Gallery in the WordPress Admin
The images that have been optimized will show optimization statistics in the WordPress Admin Media Gallery. Go to Media -> Library in the WordPress admin. The image optimization process starts with the oldest images and works to the most recent. For that reason, if the image optimization is not at 100% yet, you will not see data in the LiteSpeed Optimization column yet. Navigate through the pages of images to find where the optimization process is at and see the statistics. After the next day when more images are processed, you should notice that the most recent optimized image should have changed.

This screenshot shows the breakpoint of those images that have been optimized and those have not yet been optimized. The original images are optimized – which typically aren’t a huge change given that most images are highly compressed to start with. The WebP images show a larger gain as the algorithm used to generate them has significant gains over a JPG or PNG algorithm.
Analyze Optimized Images on the Filesystem
One could also see the image optimization progress by checking the images on the filesystem. This of course requires direct access to the webserver via FTP, a website admin like HPanel, or a terminal connection. The optimized original JPG/PNG and WebP images are stored right along side of the uploaded images in the wp-content/uploads/ directory. The images are organized in a year/month/ directory structure based on when the images were uploaded.
For each uploaded image after the images are optimized you’ll see the following:
image-name.bk.jpg: This is the original image that was uploaded and now renamed to include the.bkto indicate it’s a backup file.image-name.jpg: This is the optimized version of the originally uploaded image (which was renamed to include.bkin the filename).image-name.jpg.webp: This is the optimizedwebpversion of the original image.
In addition to these original full sized images, there are additional resized images based on the image sizes used by the theme of the site. Thus the same variants of the above images will also show with a -WxH in the filename. These smaller dimension images are critical to ensure that smaller file sizes are used when a full-sized image isn’t needed (which is most of the time).
It is beneficial to note how the QUIC.cloud image optimization quota works. Let’s assume that theme has 3 different size variants of an image (150x150, 300x649, 500x500). Those three sizes plus the original image are all considered 1 image for the quota of QUIC.cloud. Thus 200 original uploaded images plus all of their size variants will be processed per day.
Other Findings
One other issue I found in this process was that the .htaccess entry I made – per a suggestion from a post found somewhere on the internet – wasn’t a very good solution for what it was intended to do… It only restricted GET requests but everything else was wide open to the world… A good reminder that you can’t trust everything you read on the internet. And yes, that statement is ironic as it’s written in a post on the internet. No offense taken if a trust but verify methodology is used by those that take guidance from this post. This is just a record of one mans findings – results may vary.
Other Debugging Methods Explored
At this point, the tutorial is essentially complete. As pointed out above the root of the issue was a 403 status code returned by the webserver which prevented pulling of images from QUIC.cloud to the webserver which was self-inflicted by a .htaccess directive. But in the process of finding the final solution, I went through a series of other investigatory steps. I documented them along the way. While they technically aren’t valid to the solution, there might be some value to others in the process I took and the other areas that were considered as possible issues. So here goes some ramblings about un-fruitful debugging.
Manually Trigger Image Optimization
Since the images weren’t processing on a schedule, I figured they might if I manually trigger them despite the LiteSpeed module saying I shouldn’t. So in the WordPress admin I went to LiteSpeed Cache -> Image Optimization and triggered the three buttons to see if I could get anything to work.
- Clean Up Unfinished Data
- Send Optimization Request
- Pull Images
None of these did much of anything beneficial though. Really they are doing the same code logic as the cron. That means they always ran into the same 403 error I had been hitting all along.
Refresh QUIC.cloud connection
I attempted to refresh the connection between my WordPress site and QUIC.cloud. Open and honest – I’m not 100% sure what this all does. But it doesn’t seem harmful. In my situation, it didn’t seem beneficial either though. I saw several references from the QUIC.cloud staff posted on help forums indicating this may help in some cases though.
In the WordPress Admin:
- Go to:
LiteSpeed Cache -> General -> Domain Key - Click the Redetect link in the top right corner of this section
After this, try to send and pull images again manually or wait for the CRON job to complete running.
DNS Proxy Status
The tech-stack for this WordPress site includes having it’s DNS hosted at Cloudflare. Within that, the A Record and CNAME are configured to be Proxied. This means that the IP address of the webserver is actually masked by a Cloudflare IP address which adds another layer of security as bad-actors can’t find the true IP address of the webserver. Hard to attack what you can’t find!
The thought here is that the obfuscated IP address was causing issues. The IP of the webserver is configured in the LiteSpeed settings both in the WordPress Admin as well as in the QUIC.cloud configuration. If the IP address of the server isn’t what it is due to being proxied, that could cause a communication breakdown.
For the record, the webserver IP address is configured under LiteSpeed Cache -> General -> Server IP in the WordPress Admin as well as in QUIC.cloud at Settings -> Server IP when clicked into a domain. (https://my.quic.cloud/dm/www.example.com/setting)
But to be clear, I found that this is not a necessary change to make and I ended up leaving the Proxied check box enabled in Cloudflare and still found success in getting the images to optimize via QUIC.cloud.
Manually Trigger the WordPress Cron
The QUIC.cloud image optimization process relies heavily on the WordPress cron infrastructure. So this prompted me to explore if the cron was running correctly or not. One way to determine if it’s running or not is if the sites themes and plugins are auto-updating (if configured). They were, thus implying that all was running as expected. But if you have doubt and really want to force the cron to run you can do so by simply opening this URL in any web browser. NOTE: insert your actual domain name in place of example.com.
https://www.example.com/wp-cron.php?doing_wp_cron
When you open that page you’ll just see a blank page. This is expected and how WordPress designed the cron system. But sadly you won’t see immediate results in the image optimization just by visiting this page. This action kind of just raised a flag saying “I’d like the cron to run now”. But the there are many things that get run when this occurs and most are at set intervals like every 15 minutes, twice a day, etc. I believe the image optimization runs every 15 minutes and thus you still need to wait a while for it to run.
Manually Trigger an Image Pull Request from Local Machine
This is where things get more technical and you have an opportunity to break things if you don’t do things correctly. But this is how the status code of 403 was identified and ultimately lead to solving the root issue that prevented the optimized images from pulling down from QUIC.cloud. Debugging what the code is doing gives all the information – the trick is knowing how to read the code, what files are of imporatance, and how to get useful information out of it.
Identify the Image Optimization Pull URL
After reading the code, it was identified the process stopped when the pulled images URL was requested. The URL called is from the webserver to itself via a GET request. It is an authenticated request with a nonce (a one time token). There are two ways to find this URL.
Built In LiteSpeed Debug Logging
Enable the LiteSpeed debug logging from the WordPress Admin by going to LiteSpeed Cache -> Toolbox -> [6] Debug Settings and setting the Debug Log option to On and clicking the Save Changes button. NOTE: you’ll want to turn this off at some point as leaving this on long term is not ideal. This will write data to a file at wp-content/debug.log relative to the WordPress root directory. Additionally you may want to delete this file after you are done with your research as it will not be helpful long term.
The issue with this file is there is a lot of data in it and finding the desired URL is difficult unless you know what you are looking for.
Manually Create Debug Logging
Using a text editor (nano, vi, vim, Notepad++, etc.), open file wp-content/plugins/litespeed-cache/src/task.cls.php. Around line 107 look for a function called async_call(). Go near the bottom of this function and right before wp_remote_post add this line.
1 | error_log( "url: " . $url . PHP_EOL, 3, "/path/to/debug.log" ); |
Replace /path/to/debug.log with a file location you can write to on your server. This code is going to log data to that file that we will need to reference. Save the file.
Go into the WordPress Admin to LiteSpeed -> Image Optimization and click the Send Optimization Request button. Wait a minute or two. Then click the Pull Images button.
Now look into the /path/to/debug.log file – data should now have been written to that file. That URL has a nonce that is unique to your server and thus needs to be fetched this way. With that URL captured, the edit to the file can be reverted. The URL will look something like this:
https://www.example.com/wp-admin/admin-ajax.php?action=async_litespeed&nonce=34be8c0f1c&litespeed_type=imgoptm_force
Manually Call the Pull Images URL
With the URL identified, a test request can be made to see what the status code is.
curl -H 'Content-Type: application/json' -d '{"timeout": "0.01","blocking": "","sslverify": ""}' -v -X POST https://www.example.com/wp-admin/admin-ajax.php?action=async_litespeed&nonce=34be8c0f1c&litespeed_type=imgoptm_force
This can be done via a command line terminal with the above curl command. If this is done on the same machine as the webserver it will use the same IP address as what WordPress did. Given that was the root of the issue outlined in this tutorial, the status code was still a 403.
This can also be done from any desktop machine using a software called Postman. Click the Import button and paste the curl command into Postman and then send the request. This request will come from the IP address of that desktop machine.
Regardless of the method used, the request should come back with a decent sized response. But what is important here is the status code. If using curl from the command line, look for the line that starts with HTTP and see what the number after it is. For this to be successful, it needs to be a 200 (meaning things worked as they should). However any other status indicates issues. See below in the references section for a link to other reasons a 403 status code may be returned.
This bit of debugging is where the epiphany moment came. Initially this URL was hit via Postman which was coming from the whitelisted IP address and thus things worked. But when WordPress ran this same request it always failed. Thus the IP restriction in the .htaccess file was part of the issue here.
