I was surprised to not be able to find a direct answer to this on the internet… I’m developing multiple Magento extensions that require a menu in the Magento Admin. But in an effort to preserve space on the menu bar and keep some cleanliness and organization, I need to create a single new parent menu option with other extensions feeding into that parent menu option.
Contents
Update
This article was updated on January 5th, 2016 with updated code samples to implement proper ACL requirements.
ACL – Access Control Lists
Before we dive in, I want to quickly explain what the ACL tags are for those of you that aren’t familiar. ACL stands for Access Control Lists and are what Magento uses to grant user roles access to certain features of the Magento Admin under System -> Permissions -> Roles.
Typically you would grant access of a module, or parts of a module, to a user role, which then gets assigned to a user.
Under the diverse menu structure listed in this tutorial however, it appears you need to go one step further. Not only do you have to grant access to the module, but you also need to grant access to the menu options that are created in from the instructions outlined here. I’m not 100% sure why this is the case, but I think it’s safe to assume that since the menu is spread across multiple modules it’s needed for Magento to understand how your menu works.
The XML does get a bit large from the ACL, but it’s a game of nesting children to get the correct hierarchy structure.
Place an Admin Extension Menu into A Custom Parent Menu
The solution to this is really quite simple when you think about it. Magento renders XML in order based on how it is defined in the configuration.
app/etc/modules/PromInc_All.xmlThat understood, you simply need to define the parent menu in that file before adding the child menu. I found the best way to accomplish this was to simply define another extension in your namespace and ensure that it is the first extension declared in the configuration file.
<?xml version="1.0" encoding="utf-8"?>
<config>
 <modules>
   <PromInc_Adminhtml>
     <active>true</active>
     <codePool>local</codePool>
   </PromInc_Adminhtml>
   ...
   <PromInc_OtherExtension>
     <active>true</active>
     <codePool>local</codePool>
   </PromInc_OtherExtension>
 </modules>
</config>
We declare the Adminhtml extension first in this file. You can then declare any other extensions that you need after that, and they can then reference the XML for the menu created by the Adminhtml extension.
Adminhtml Extension
To elaborate, first create an extension called Adminhtml within the PromInc directory.
app/code/local/PromInc/Adminhtml
In this extension, create adminhtml.xml within the etc directory.
# app/code/local/PromInc/Adminhtml/etc/adminhtml.xml


<?xml version="1.0" encoding="utf-8"?>
<config>
  <menu>
    <parentmenu translate="title" module="adminhtml">
      <title>Parent Menu</title>
      <sort_order>80</sort_order>
      <children>
        <parentsubitem>
          <title>Child from Parent Extension</title>
          <sort_order>1</sort_order>
          <action>...</action>
        </parentsubitem>
      </children>
    </parentmenu>
  </menu>
  <acl>
    <resources>
      <all>
        <title>Allow Everything</title>
      </all>
      <admin>
        <children>
          <parentsubitem translate="title" module="adminhtml">
            <title>Menu Options - Parent Menu</title>
            <sort_order>600</sort_order>
          </parentsubitem>
        </children>
     </admin>
   </resources>
 </acl>
</config>
NOTE: I added a child menu here for illustration purposes. This is not required and you could simply remove the <children> tag if not needed.
The <acl> section of this XML allows you to enable or disable the menu options.
Other Extensions
Now, when you create the other extensions that you would like to appear in this parent menu, you simply need to reference that parent menu.
We already declared our second extension above, so now we need to create it. I’ll only illustrate what is needed to create the menu pieces – the other features of the extension you’ll have to develop.
# app/code/local/PromInc/OtherExtension/etc/adminhtml.xml


<?xml version="1.0" encoding="utf-8"?>
<config>
  <menu>
    <parentmenu>
      <children>
        <optionfromotherextension translate="title" module="otherextension">
          <title>Child from another extension</title>
          <sort_order>700</sort_order>
          <action>...</action>
        </optionfromotherextension>
        <option2fromotherextension translate="title" module="otherextension">
          <title>Second Child from another extension</title>
          <sort_order>701</sort_order>
          <action>...</action>
        </option2fromotherextension>
      </children>
    </parentmenu>
  </menu>

  <acl>
    <resources>
      <all>
        <title>Allow Everything</title>
      </all>
      <admin>
        <children>
          <!-- Grant Access to Pages/Features of Module -->
          <otherextension>
            <title>Other Extension</title>
            <sort_order>620</sort_order>
            <children>
              <items module="otherextension">
                <title>Manage Other Extension</title>
                <sort_order>0</sort_order>
              </items>
            </children>
          </otherextension>

          <!-- Display Menu Options for Module -->
          <parentmenu translate="title" module="adminhtml">
            <children>
              <otherextension>
                <title>Other Extension Menu Items</title>
                <children>
                  <items module="otherextension">
                    <title>Parent Menu Option for Other Extension</title>
                    <sort_order>1</sort_order>
                  </items>
                  <optionfromotherextension module="otherextension">
                    <title>Child from another extension</title>
                    <sort_order>2</sort_order>
                  </optionfromotherextension>
                  <option2fromotherextension module="otherextension">
                    <title>Second Child from another extension</title>
                    <sort_order>3</sort_order>
                  </option2fromotherextension>
                </children>
              </otherextension>
            </children>
          </parentmenu>
        </children>
      </admin>
    </resources>
  </acl>
</config>
By calling the <adminhtml> tag in our <menu> we are telling Magento to add these child items to the <adminhtml> parent menu item that we declared in the previously declared parent menu.
Notice that I added multiple children items here. You can add as many as needed – just make sure that you use unique names for each child tag. Additionally, add each child into the ACL children structure as well.
You could also create children of the children by adding a <children> tag to a child.
# app/code/local/PromInc/OtherExtension/etc/adminhtml.xml


<?xml version="1.0" encoding="utf-8"?>
<config>
  <menu>
    <parentmenu>
      <children>
        <optionfromotherextension translate="title" module="otherextension">
          <title>Child from another extension</title>
          <sort_order>700</sort_order>
          <action>...</action>
        </optionfromotherextension>
        <option2fromotherextension translate="title" module="otherextension">
          <title>Second Child from another extension</title>
          <sort_order>701</sort_order>
          <action>...</action>
          <children>
            <option2fromotherextensionchild translate="title" module="otherextension">
              <title>Second Child from another extension - Child item</title>
              <sort_order>702</sort_order>
              <action>...</action>
            </option2fromotherextensionchild>
           </children>
        </option2fromotherextension>
      </children>
    </parentmenu>
  </menu>

  <acl>
    <resources>
      <all>
        <title>Allow Everything</title>
      </all>
      <admin>
        <children>
          <!-- Grant Access to Pages/Features of Module -->
          <otherextension>
            <title>Other Extension</title>
            <sort_order>620</sort_order>
            <children>
              <items module="otherextension">
                <title>Manage Other Extension</title>
                <sort_order>0</sort_order>
              </items>
            </children>
          </otherextension>

          <!-- Display Menu Options for Module -->
          <parentmenu translate="title" module="adminhtml">
            <children>
              <otherextension>
                <title>Other Extension Menu Items</title>
                <children>
                  <items module="otherextension">
                    <title>Parent Menu Option for Other Extension</title>
                    <sort_order>1</sort_order>
                  </items>
                  <optionfromotherextension module="otherextension">
                    <title>Child from another extension</title>
                    <sort_order>2</sort_order>
                  </optionfromotherextension>
                  <option2fromotherextension module="otherextension">
                    <title>Second Child from another extension</title>
                    <sort_order>3</sort_order>
                  </option2fromotherextension>
                  <option2fromotherextensionchild module="otherextension">
                    <title>Second Child from another extension - Child item</title>
                    <sort_order>4</sort_order>
                  </option2fromotherextensionchild>
                </children>
              </otherextension>
            </children>
          </parentmenu>
        </children>
      </admin>
    </resources>
  </acl>
</config>
Test Implementation
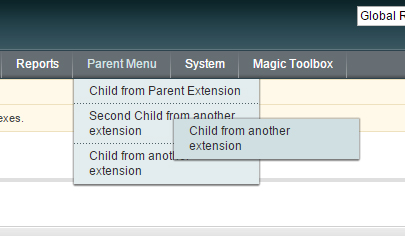
That should be it. Clear the cache and refresh the Magento admin page and you should see your new menu options from multiple extensions under one parent menu option.
Notes
- Because this implementation is done via XML you’ll need to clear the cache before the changes will be applied.
- This example was done on Magento 1.6.2 but I believe it should hold true through other versions.
- I am using the company/namespace of PromInc in this example. That should be adjusted to match your own development scenario.
- For the <action> tags I used … as the value. This should be the replaced with the path to the page you wish to load.
- The module parameter for each of menu options must match the module that it is being declared from, not the parent module.
