Read on for an example on how to use the QNAP Container Station API to manage the Container Station configuration. In this example you’ll learn how to get an Authentication cookie from the QNAP Container Station API and then use that to make subsequent requests to get a list of containers and modify the configuration on them.
This tutorial uses Postman to store, manage, and request the API calls to the QNAP Container Station API. Postman is a software application for making API requests. Other methods of making API requests can be used of course – curl being the most common method by many programmers. I’ve fallen in love with Postman however mainly on the basis of the ability to easily configure and store all of my API requests for any platform into one tool.
Postman also offers Environments to store configuration variables for various servers, services, etc. That is out of scope for this post – something I may have to cover at a later time… But documentation on how to use that exists on the internet elsewhere already.

Contents
Why Use the Container Station API
Getting back on track to this tutorial on how to use the Container Station API – I want to talk a bit about why one would want to use this. For me, it was sparked by the limitations of how the QNAP Container Station software works. As you may (or may not) know, QNAPs Container Station is really just a graphical interface for managing containers – I personally use docker all the time, but there are also lxc and lxd containers that can be used in Container Station. While I like their GUI, it’s not very good… (sorry QNAP – just speaking the truth here…)
After a container is up and running, you can’t reconfigure it in the GUI. It’s configuration can be changed via the command line, but by default QNAP doesn’t allow Docker to be easily accessed via the command line. (see my post Access Docker Command via SSH on QNAP TS-251 for some tricks on this) But even if I have access to the Docker command, I’ll be honest – I’m a bit rusty on the docker commands as I don’t run them often enough… But I created a new container with a newer version and simply needed to turn off the Auto Start property of the old container (didn’t want to delete in case I needed to fall back to it some day). But for whatever reason the GUI would never let the Save button be activated and thus I couldn’t complete what I needed in the QNAP admin.
Additionally, I’ve found the QNAP web admin to be painfully slow. I am running a TS-251 which has a Celeron processor and isn’t one of their powerhouse models – I get that. But at one point I waited 15 minutes for Container Station to load a page and it still never returned… this isn’t manageable and I’m still not sure why it’s this painfully slow. The irony of this is that the API calls respond in a fraction of a second and I can move on with my day. In fact I think I spent less time researching how to use the API, not liking the documentation and thus wrote this post in hopes to help myself and others out in the future, AND changed the setting in less time than I spent trying to get the Container Station to load and save via the QNAP web admin… Sad but true.
Download Postman on your Computer
If you don’t have Postman already installed, download it from their website.
NOTE: They may ask you to create an account with Postman. That’s your personal choice, but this tutorial works (at least at the time of writing) without needing an account. I don’t have one personally.
Configure Postman
In Postman:
- Click the Import button
- Select Raw text
- Paste the configuration below into the text area and click the Continue button.
- The following values will need to be set to your servers specifications before importing:
<qnap_server_ip_address>: The IP address of the QNAP server<qnap_server_port>: The port of the QNAP server<qnap_server_user_username>: The username of a user on the QNAP server<qnap_server_user_password>: The password of a user on the QNAP server
- The following values will need to be set to your servers specifications before importing:
- A confirmation page will be shown – click the Import button.
1 2 3 4 5 6 7 8 9 10 11 12 13 14 15 16 17 18 19 20 21 22 23 24 25 26 27 28 29 30 31 32 33 34 35 36 37 38 39 40 41 42 43 44 45 46 47 48 49 50 51 52 53 54 55 56 57 58 59 60 61 62 63 64 65 66 67 68 69 70 71 72 73 74 75 76 77 78 79 80 81 82 83 84 85 86 87 88 89 90 91 92 93 94 95 96 97 98 99 100 101 102 103 104 105 106 107 108 109 110 111 112 113 114 115 116 117 118 119 120 121 | { "info": { "_postman_id": "f7794814-e7c0-4024-ac34-6464161650ee", "name": "QNAP Container Station", "schema": "https://schema.getpostman.com/json/collection/v2.1.0/collection.json" }, "item": [ { "name": "Container Station", "item": [ { "name": "Authentication", "request": { "method": "POST", "header": [], "body": { "mode": "raw", "raw": "{\"username\": \"{{username}}\", \"password\": \"{{password}}\"}", "options": { "raw": { "language": "json" } } }, "url": { "raw": "{{server_url}}container-station/api/v1/login", "host": [ "{{server_url}}container-station" ], "path": [ "api", "v1", "login" ] } }, "response": [] }, { "name": "Auto start", "request": { "method": "PUT", "header": [], "url": { "raw": "{{server_url}}container-station/api/v1/container/docker/d3110ef06b0ceb58feb0072ae36da52f557a1381c58043734ee7a713417827f1/autostart/off", "host": [ "{{server_url}}container-station" ], "path": [ "api", "v1", "container", "docker", "d3110ef06b0ceb58feb0072ae36da52f557a1381c58043734ee7a713417827f1", "autostart", "off" ] } }, "response": [] }, { "name": "List containers", "request": { "method": "GET", "header": [], "url": { "raw": "{{server_url}}container-station/api/v1/container", "host": [ "{{server_url}}container-station" ], "path": [ "api", "v1", "container" ] } }, "response": [] } ] } ], "event": [ { "listen": "prerequest", "script": { "type": "text/javascript", "exec": [ "" ] } }, { "listen": "test", "script": { "type": "text/javascript", "exec": [ "" ] } } ], "variable": [ { "key": "server_url", "value": "http://<qnap_server_ip_address>:<qnap_server_port>/", "type": "default" }, { "key": "username", "value": "<qnap_server_user_username>", "type": "default" }, { "key": "password", "value": "<qnap_server_user_password>", "type": "default" } ] } |
This creates a collection of requests with your configuration set in Postman. These can be clicked on to run the requests.

How to Use the QNAP Container Station API
An authentication cookie needs to be fetched and stored in Postman before future requests will function as expected. To do this, run the Authentication request. A response similar to this will show indicating success.

More importantly, you’ll be able to see the cookie needed is now set.

With this now set, the other requests within this collection will function as expected. They will utilize the cookie set by the Authentication request and thus the other requests will succeed.
List Containers
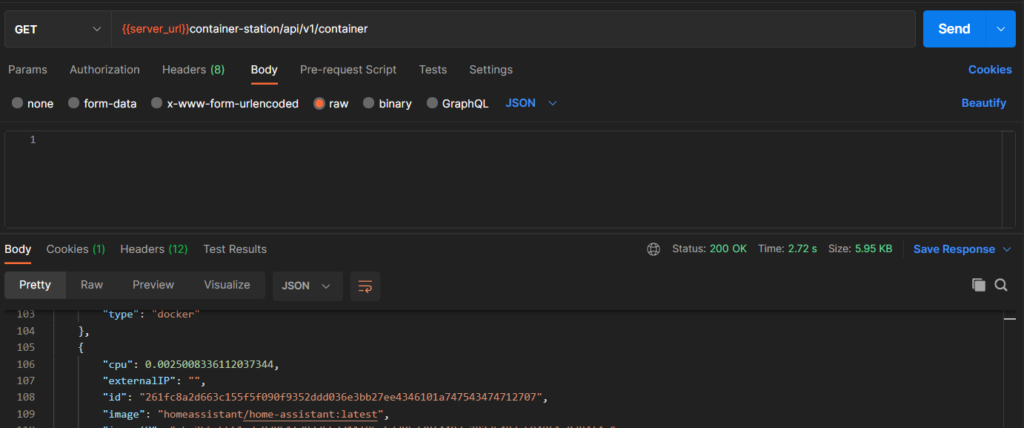
Now that the Authentication cookie has been set, a list of the containers in Container Station can be obtained by calling the List Containers API request. Open that request in Postman and click the Send button (no configuration is needed for this request). The response is a JSON object of all of the container information from QNAPs Container Station.

Modify a containers Auto-Start setting
Now that we are authenticated and know container information, we can use the API to modify the settings of a container. As just one example, let’s change the Auto-Start configuration setting on a container.
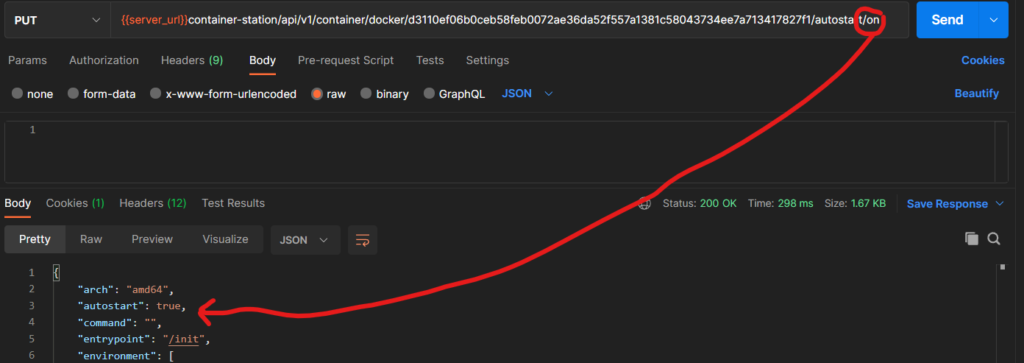
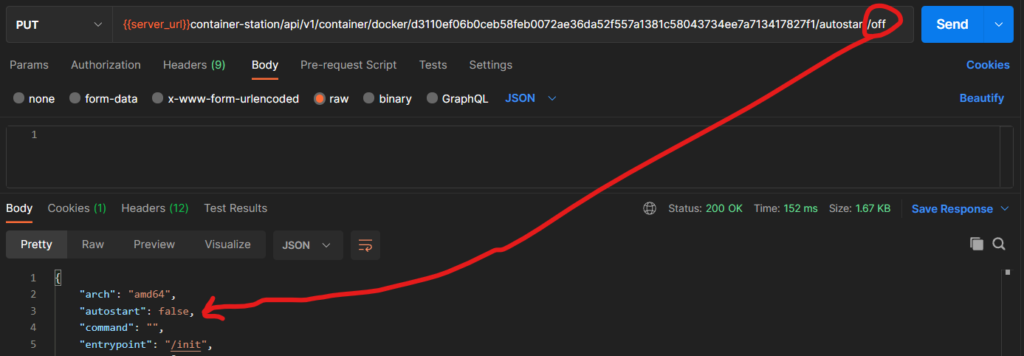
For this, the Auto Start API in the Postman collection provided in this tutorial will be used. Open the request in Postman and modify the URL.

container_type: (red highlight in above screenshot) The type of container. This is obtained from thetypeproperty of the List Containers API response. Valid values:lxclxddocker
container_id: (green highlighted in above screenshot) The ID of the container. This is obtained from theidproperty of the List Containers API response.state: (yellow highlight in above screenshot) The state of the Auto Start setting that you wish to set it to. Valid values:onoff
Once the URL is configured press the Send button in Postman and the response will indicate the current state of the container – including the value of the autostart property that was just set.


Next Steps
There is a lot more that can be done with the API. This tutorial outlines the basics on how to get setup and make a useful call to the API to change a setting on a container. But there are other uses of the API and QNAP has documented all of those functions already (see references below).
Postman is such a powerful tool and this tutorial only scratches the surface of how it can be used. The purpose here was to get you headed down the right path of getting Postman setup, how to use it, and thus you can run from here as needed. You can duplicate requests in Postman, change the name and the path and arguments as needed and from there you’ll have a great toolbox at your disposal for the next time you have a need to work with QNAPs Container Station via the API.
QNAP Container Station API References
NOTE: At the time of writing, QNAP Container Station 2 was used. Days before writing this, QNAP had just recently announced that Container Station 3.0 was in Beta. I have not (yet…) opted into this Beta program and thus I don’t know if this process will work in the future or not. I’m excited to find out!
