I know that while I’m writing this post, Adobe is far past Photoshop CS6, and they have their cloud service and I’m sure there are new features. Regardless, I still use CS6 and really enjoy it. Lately I’ve been utilizing a newer feature that I’m falling in love with – video editing within Adobe Photoshop.
Now really, this is kind of a funny/odd post for me to write. I earned my college degree in video production and the first 5 years of my career life were in the video production world producing everything from TV commercials to short films to corporate training videos, etc. You name it, I had my hand in it – that even includes the full graphics packages for TV news shows.
That said, video editing in Photoshop will never replace Final Cut Pro (the older good version), Premiere, After Effects, Avid, etc. At least CS6 won’t. But for basic cut videos, some basic transitions, simple compositing, etc. it’s actually a pretty good editor. And aside from it having the basic tools to make it work great, here is why – every good video needs graphics. And what does every video editor do for their graphics? They build them in Photoshop and then figure out how to import them into their editing or compositing software. So why not put this all in one place? Makes sense, right?

This article is not focused on how to be a video editor – it assumes you have some general knowledge on how to edit. What it does focus on however is tips, tricks, layout, and possible gotchas or issues you might find. What it comes down to is that Photoshop does offer a nice video editing option, however there are some slight changes to workflow you’ll need to account for.
Contents
Examples
Here are a few videos done following the workflow outlined in this article. Again, these are not Telly worthy videos, but not bad for working with what I have on hand – a copy of Photoshop CS6 and a DSLR camera with a decent microphone.
Workflow
Video projects in Adobe Photoshop are saved in the familiar PSD format that Photoshop typically works in.
To begin, you need to choose to show the Timeline panel. This is found under Window -> Timeline.

Depending on if you’ve used the timeline panel before, you may see it display in one of two ways to start – Adobe Photoshop offers two types of timelines. There is an animation timeline designed more for still frames, and the video editing timeline that this article is focusing on. If the video editing timeline shows, click the button in the middle of it to create a timeline and begin importing video clips. However if the animation timeline shows, click the video timeline icon in the bottom left corner to switch it to the video timeline method.


Keyboard Shortcuts
By default, video editing keyboard shortcuts are not enabled. However they can be quickly enabled from the sub-menu on the Timeline panel.

With the video editing keyboard shortcuts enabled, the arrow keys move you frame by frame, up and down arrows move you to the in / out points of a clip, page up and page down jump you around, etc. Keep in mind – these keys now function for all of Photoshop, so using the arrows will not move an object on the canvas, rather your timeline marker. So you may end up switching the video keyboard shortcuts on and off a bit.
Previewing Clips
Photoshop doesn’t offer a standard preview or viewer window like most traditional video editing software does. So this means if you want to view to simply check the contents of it, you’ll need to either put it right onto the timeline and scrub through it, or use an external video player – which is the method I personally prefer to use. I’ll open a clip in Windows Media Player or VLC, scrub through it to find the best take of a scene, and then just import the best take into my Photoshop video timeline project. This does help to reduce clutter in your project which is nice. But it does take a bit of getting used to since you’re now using the windows explorer window, a video player software, and Photoshop to all blend things together.
Importing Video Clips
To import a video clip, find the + icon on the right hand side of the timeline track you wish to add it to. Clicking on this will open the file browser, and you can pick your clip. This will add the video clip to that track, as well as that bin in the layers panel. Note that you can add video clips, PSD files, or other image files to the track this way.

Alternatively, you can import a video layer using the menu system at Layer -> New Video Layer from File. This will import the clip into the folder that you have selected.

Color Correction
I’ve always love Photoshop’s levels and curves color correction tools. So to that point, this is a huge perk of doing video editing in Photoshop – that’s how we accomplish color correction!
In the Layer Panel, select the clip you wish to color correct (and you’ll of course want your timeline marker over this clip so that you can see your edits), and choose the Layer Mask button in the bottom of the Layer Panel and choose your desired layer mask. As I mentioned above, I prefer to use either levels or curves. Adjust the color as you see fit using these controls and you’re all set!
If you are new to layer masks, I’ll point out a few things quick. Layer masks get added as a layer in the Layer Panel and affects ANY layer that is below it. However you can easily change this to affect only one layer by setting a Clipping Mask on the layer mask. This can be done by right clicking on the layer mask and choosing Set Clipping Mask, or you can set it via the Layer Mask Panel. If you don’t use layer masks with or without clipping masks, you need to start experimenting with them – you’ll wonder how it is you’ve use Photoshop without them before!!!!
The Bin Structure
In Photoshop, there are two types of bins you can create for editing – the video bin and the standard bin (folder). There’s one key difference here – with a video bin all of your layers within it will layout horizontally one after another. So it’s one solid track of video, no overlapping (unless you use a cross-fade) or stacking of layers / clips. This is great for doing your A Roll or B Roll tracks. Alternatively, you can use the standard bin if you need to stack layers. So lets say you’re building a lower 3rd, you’d want to use the standard bin.

Audio
You can add audio in Photoshop, but the editing tools are nothing glorious, that’s for sure. This is one of the weak points here. But that doesn’t mean you can’t get good results yet.
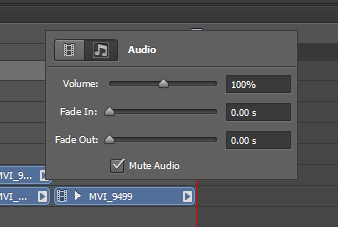
There is only one audio track in Photoshop’s timeline. Well, ok, not really. There’s one dedicated audio track, but each video clip can also have video. So for your B-Roll tracks, you may want to disable the audio, which has to be done on a per clip basis. To do this, click on the triangle in the right corner of each video clip to open the clip menu, and choose the Audio tab and check the Mute Audio checkbox.
There are no waveforms, and of course no mono/stereo controls. So at best, you can get a rough audio edit done in Photoshop.
What I then do, is edit the audio track in Audacity – or really any other audio editor. But Audacity is pretty impressive at what you can get done for a free piece of software. One more note about Audacity – it requires an audio file only for you to edit. But Photoshop only exports video files with audio – not audio only files. So I’ll edit in Photoshop till I’m picture locked, then export the video to an mp4 file. I then use VLC to export the audio only to a WAV file. (See Export a WAV Audio File from Any Video Clip with VLC for instructions on how to export audio clips from video files.) That WAV file can then be imported into Audacity for editing.
If you’ve shot your audio like I do, where you have a reference track using your onboard camera mic and the other audio track is the external lav or boom mic, you need to clean up the audio before you complete your video. Photoshop does not offer the functionality for this, so here is one big place where Audacity comes into play. For instructions on how to use Audacity for creating a stereo track from your mono audio track, check out this article.
One other tip I do to make the audio track sound cleaner and more professional is to ensure that it has continuous whitenoise through the entire track. In your gaps between clips and voice tracks, you don’t want to dip to complete silence since all recorded sound has some natural whitenoise in the background. Using Audacity, you can quickly fill those gaps with whitenoise to ensure you have the clean audio track. For help on this, feel free to read this article on how to fill in silence gaps with whitenoise using Audacity.
I then export from Audacity to an mp3 file, which can be added to Photoshops one audio track. Lastly, I mute the audio for all of the video clips in Photoshop, and we are all set to go!
Performance
I’m using an Intel I3 processor with 8 GB of RAM, and typically my video doesn’t play 100% smooth. Much of the time I have to start playing before my clip to get the audio and video to sync up enough on playback to get a good sense of what the edit actually is. As a professional video editor, this is not ideal, and I’m not 100% sure if the problem lies in the hardware on my machine, the fact that Photoshop isn’t powerful enough to be that good of an editor, or if it’s the media I’m using. I shoot on a Canon T2i in 1080i in MPEG format, and so the source video could be the issue. And most likely is a big part of the issue. I’ve done straight graphics on the timeline and they play back much better – not as good as Final Cut or Premiere do for me, but far better than the video clips.

One thing to help the performance of your machine however, is first off close down applications and windows you aren’t using. This is the basics of computer performance that many of us may forget with the new beefier machines, but the more stuff open the more taxing it is on the system. Kind of along those lines though, is something else you can do to help. Photoshop saves a cache of video previews and undo history. At times, when it gets bogged down too much, I’ll simply clear those caches and it tends to help out a bit. This can be found at Edit -> Purge -> Video Cache and Edit -> Purge -> All. If clearing those to doesn’t help, it’s often times worth just closing out of Photoshop, wait a minute or to for it to fully close in the background, and then re-open your project.

Cautions from Video Editing in Adobe Photoshop
I should throw out a few cautions that I have come across that might help save you a few headaches:
- Keep a close eye on what moves on the timeline when you move an object or two. It likes to link clips together by closing gaps you may have intentionally left between clips. Sometimes shifting one object moves more than you might think and you’ll have to go back and readjust some things. Typically, if it’s going to move more than you think, it’ll essentially move everything beyond a point, so you’ll need to adjust several clips typically – not just one. One way around this is to create a new video bin for doing edits. Move a single clip into that new video bin. Adjust the in and out points, move it left to right on the timeline, and once you are happy with the edits you’ve made, you can drag it straight up / down on the timeline into the video bin you want it to live in.
- It’s a bit slow at times, and playback isn’t always 100% real-time. So it’s a bit harder to be precise, but typically it’s close enough to get the job done. Starting your playhead a bit ahead of where you’d like to check for video and audio sync, etc. is advised. Also, how well it performs will depend on your machines hardware, the codec of your video and audio clips, the number of layers you have, how much keyframing you are doing, etc. So your results may vary from mine.
