Adding Zigbee to Home Assistant with HUSBZB-1 through the ZHA (Zigbee Home Automation) integration is a rather straightforward integration. QNAP servers are great systems that can be expanded for such things as home automation, and the HUSBZB-1 opens up the possibilities by adding Zigbee to your home network.

Contents
What is a HUSBZB-1 Zigbee Coordinator
A Zigbee coordinator is the central device that connects all of the Zigbee devices (endpoints) on a network together. It then communicates with the home automation software (Home Assistant), passing all of the information from the sensors to the automation rules.

There are many Zigbee coordinators to choose from on the market. The HUSBZB-1 is unique in that it offers both Zigbee and Z-Wave radios. The price-point of the HUSBZB-1 is relatively the same as other Zigbee coordinators, which of course makes this a compelling device. Two network radios for the same price?
Setup HUSBZB-1 on QNAP TS-251
A few configurations steps are required to ensure the HUSBZB-1 device will talk correctly to Home Assistant. This tutorial assumes that QNAP Container Station is used for running Home Assistant on QNAP.
Add Drivers to QNAP
The first step is to get the HUSBZB-1 setup on the QNAP device itself. The drivers are not loaded by default. But they can be added quickly by using the insmod command. [insmod manual]
To do this, you’ll need SSH access to your QNAP server. I won’t go through the details on how to set this up as QNAP has a great tutorial for setting up SSH access and it’s not worth me repeating.
Once SSH access is setup, follow these steps.
- Connect to the QNAP server via SSH
- Run the following commands
insmod /usr/local/modules/cp210x.ko
insmod /usr/local/modules/usbserial.ko- Unplug the HUSBZB-1 USB stick
- Plug the HUSBZB-1 USB stick back in
- In SSH confirm that QNAP now recognizes the HUSBZB-1 stick by running this command:
ll /dev/ttyUSB*
ll /dev/ttyUSB*
crw------- 1 <user> <group> 188, 0 Jan  9 20:51 /dev/ttyUSB0
crw------- 1 <user> <group> 188, 1 Jan  9 20:51 /dev/ttyUSB1
References:
- https://medium.com/@sysrun/quickfix-zigbee-z-wave-usb-on-qnap-e203357a8422
- https://www.sysrun.io/2017/10/20/quickfix-zigbeez-wave-usb-on-qnap/
Configure Container Station
Using an Existing Container
If you already have a container in QNAP Container Station, a modification will need to be made to tell the container how to find the new HUSBZB-1 USB stick. Sadly, QNAP doesn’t allow you to change the configuration of a container directly, but thankfully you can duplicate your existing container and modify the configuration in the new version.
- In Container Station, click on the name of the existing Home Assistant to open the container.
- Click the Settings button
- Uncheck Auto start and click Apply (this container will be abandoned soon)
- Click the Stop button to stop the container. (You don’t want more than one running at the same time)
- In the top right, click the More dropdown and choose Duplicate.
- Set a name for the new container. By default QNAP adds
-dupe, but you may want to make it more descriptive likewith USB - Check Auto start
- Click on the Advanced Settings >> link
- Click on the Device tab on the left
- Click Create to make the duplicated container and boot up the container.
Creating a New Container
If you do not have a container setup in Container Station yet, you can follow my guide: Home Assistant on QNAP TS-251 in Container Station The only difference is that on step 9 (the Devices tab) you need to do the following:
- Ensure the Run containers in privileged mode. checkbox is checked
- Click the Add button
- Pick TTY (4) from the dropdown
- Ensure the Read and Write permissions are both selected

Configure Zigbee with HUSBZB-1 in Home Assistant
Now that the HUSBZB-1 device is connected to both the QNAP NAS and Home Assistant, the last step is to integrate Zigbee and Z-Wave into Home Assistant.
- Click on Configuration
- Click on Integrations
- Click the Add Integration button
- Search for
Zigbee - Click on the Zigbee Home Automation integration
- From the Select serial port for Zigbee radio dropdown, select
/dev/ttyUSB1 - Click Submit
If all went well, you should see success! Now your Home Assistant on QNAP will have Zigbee integrated and be ready to start adding nodes (entities).
References:
Configure Z-Wave with HUSBZB-1 in Home Assistant
While I bought the HUSBZB-1 specifically because it had dual radios (and was highly touted), I don’t have any Z-Wave devices to integrate. (not yet at least…)
But since I was configuring all of this, I wanted to see if I could get Home Assistant seeing that I have a Z-Wave radio available.
I found that adding the following to my configuration.yaml and a restart of Home Assistant is all that was needed.
zwave:
 usb_path: /dev/ttyUSB0
However… after doing that, I see that this is a deprecated and unsupported method. It shows up and appears to work but don’t think this is the best long term solution.
The current recommended method is to use the Z-Wave JS integration. This requires a Z-Wave JS Server component that I have yet to explore. Someday when I look deeper into this integration I’ll update this post with more information.
Restarting QNAP Server
Unfortunately when the QNAP server restarts much of this integration gets lost and there are manual efforts that need to be done. What happens is the driver for the HUSBZB-1 gets lost and thus the system fails to load correctly. In theory there is a way to have the server add this driver at startup, but the way that QNAP has built their version of Linux makes it a bit difficult and thus I don’t have a solution at this time.

If the QNAP server restarts (ie. firmware update, power outage, etc.) here are the steps that need to be taken:
- Connect to the server via SSH
- Add the drivers
insmod /usr/local/modules/cp210x.ko
insmod /usr/local/modules/usbserial.ko- Login to the QNAP server via the web admin
- Open Container Station
- Stop the container by clicking the ∎ Stop button (square).
- Once stopped, start the container by clicking the ► Play button (triangle).
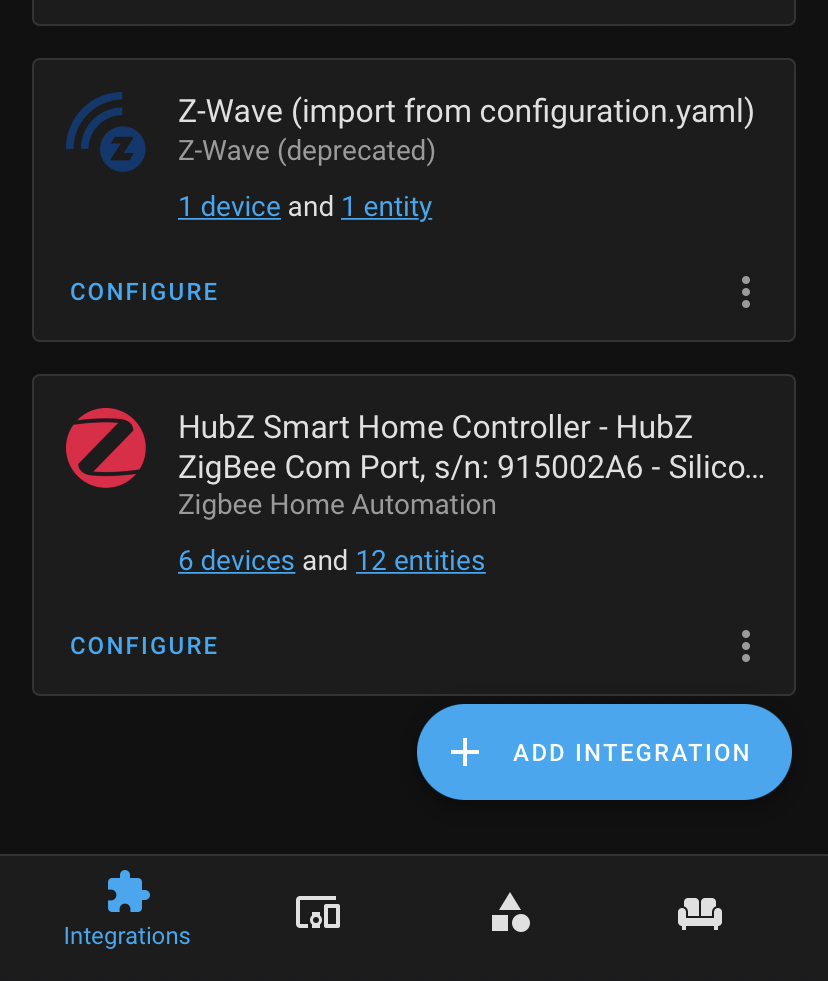
Now when looking at the Integrations page in Home Assistant you should see the Zigbee (and Z-Wave if added) integrations no longer error and all of your End Devices should be loaded without issue.
Bottom Line
Adding Zigbee to Home Assistant with the HUSBZB-1 and Zigbee Home Automation (ZHA) is likely the simplest integration method. [See post Adding Zigbee to Home Assistant on QNAP TS-251 with Container Station for other methods] However, I have personally chosen to move from the HUSBZB-1 device to ConBee II with deCONZ (and have found it to be more reliable) for these reasons:
- When the QNAP server is restarted, manual actions have to be taken to get the integration to work again
- The Aqara devices I’ve chosen to use often dropped off the network
- Connection to devices at times is slow and unreliable
I will say the ConBee II with deCONZ setup takes a bit more effort but it has proven to be worth the effort for the devices I’ve chosen to use.
