While doing a recent update to a site Google Analytics implementation from the traditional codebase to Universal Analytics I came across a few things that I felt were missing from the documentation.
I’ve chosen to implement Enhanced Ecommerce anaylitics – extra reporting is always a good thing and so why not do everything I can to ensure that an upgrade is as good as it can be. Also, having come from years of working with Adobe Omniture (Adobe Anayltics), Enhanced Ecommerce reporting fills in some of the reporting that I feel is missing in Google Anayltics.

Here is the official Enhanced Ecommerce documentation from Google:
https://developers.google.com/analytics/devguides/collection/analyticsjs/enhanced-ecommerce
But now onto the the focus of this article.
Contents
- 1 Undocumented Lessons Learned for Implementing Google Universal Analytics with Enhanced Ecommerce
- 1.1 Setup a Test Account
- 1.2 Escape Quotes
- 1.3 ec:setAction
- 1.4 checkout vs checkout_option
- 1.5 Shopping Behavior Analysis Report
- 1.6 Pageviews
- 1.7 Product IDs
- 1.8 Google Analytics Universal Request Parameters
- 1.9 Request Size
- 1.10 Update – Request Size
- 1.11 Avoiding Request Size Limitations
- 1.12 Debugging
- 1.13 Google Analytics Debugging Tools
- 2 Admin Settings
Undocumented Lessons Learned for Implementing Google Universal Analytics with Enhanced Ecommerce
Setup a Test Account
I didn’t do this. Dumb. I did all my coding in a development environment, and that allowed me to verify that my tags were sending data. All must be good, right? Well when I went live with the code, I found some of the issues that led me to write this post, and as a result we missed out on some order data, and it took me a few days to reconfigure some stuff to ensure that all of the data was sending correctly so that the reports work correctly and my custom metrics work how I wanted them to. Had I setup another Google Analytics account to send test data to I could have alleviated some of these headaches and mistakes.
Escape Quotes
Ensure you escape or remove quotes in your text strings sent to Google Analytics. They could break your code if there are erroneous quotes in your strings that then break your functions. In other words, change things like this:
1 2 3 4 | ga('ec:setAction', 'purchase', { 'coupon': 'Quotes Don't Matter' }); |
To this:
1 2 3 | ga('ec:setAction', 'purchase', { 'coupon': 'Quotes Don\'t Matter' }); |
Or this:
1 2 3 | ga('ec:setAction', 'purchase', { 'coupon': 'Quotes Dont Matter' }); |
See the difference? The quote on the word Don’t was either escaped or removed. Leaving it there would create invalid Javascript and break everything.
ec:setAction
ec:setAction is used to track specific Ecommerce actions a user takes such as add a product to the cart, view a product detail page, checkout, etc. Look at the official documentation for the full list of what actions can all be used.
You set the action with the setAction command – as an example:
1 | ga('ec:setAction', 'detail'); |
This does NOT get sent to Google Analytics until you send a hit – such as a page view, event, etc.
But the hidden lesson here is this: you can NOT set multiple ec:setAction parameters per hit. Let me say that again differently: you can only set ONE ec:setAction parameter per hit request.
So lets say on the order success / confirmation page you wish to use setAction to indicate that a purchase has been completed as well as set the Checkout step, you’d think you could do the following:
1 2 3 4 5 6 7 8 9 10 11 12 13 14 15 16 | /* setAction - Purchase */ ga('ec:setAction', 'purchase', { 'id': 'PIP12345', 'affiliation': 'PromInc Productions Web Store', 'revenue': '99.99', 'tax': '2.85', 'shipping': '5.34', 'coupon': 'TUTORIAL' }); /* setAction - Checkout step */ ga('ec:setAction','checkout', {'step': 3}); /* pageview - Send Hit */ ga('send', 'pageview'); |
What happens here though, is that the pageview hit will send and pass the checkout step only with it. The purchase setAction will NOT be sent.
The correct way to make this work is to send one of the setAction parameters via the pageview hit. Then set the second setAction for the checkout step and it to Google Analytics with an event. You can set the event to any values you’d like.
1 2 3 4 5 6 7 8 9 10 11 12 13 14 15 16 17 18 19 20 21 | /* setAction - Purchase */ ga('ec:setAction', 'purchase', { 'id': 'PIP12345', 'affiliation': 'PromInc Productions Web Store', 'revenue': '99.99', 'tax': '2.85', 'shipping': '5.34', 'coupon': 'TUTORIAL' }); /* pageview - Send Hit */ ga('send', 'pageview'); /* setAction - Checkout step */ ga('ec:setAction','checkout', {'step': 3}); /* event - Purchase */ ga('send', 'event', 'Cart', 'Purchase', 'PIP12345'); |
checkout vs checkout_option
To measure the steps in the checkout process, set ec:setAction to checkout and give it a step number that is then further defined in the Admin section of Google Analytics. But there is also a checkout_option that can be set on your ec:setAction. Don’t go thinking like I did that just passing checkout_option would suffice for both. checkout_option is just that – setting and option value to the checkout action. But oddly enough, you can send the checkout_option data within the checkout.
Confusing – I know.
So here’s what I’ve come to accept as the best way to handle this scenario:
1 2 3 4 | ga('ec:setAction','checkout', { 'step': 1, 'option': 'Visa' }); |
Here you are sending the checkout action – which is required to populate the Checkout Behavior Analysis report by defining which step this action correlates to. Also however, you are passing a checkout_option value at the same time – in the case of this example stating the payment method used for this order.
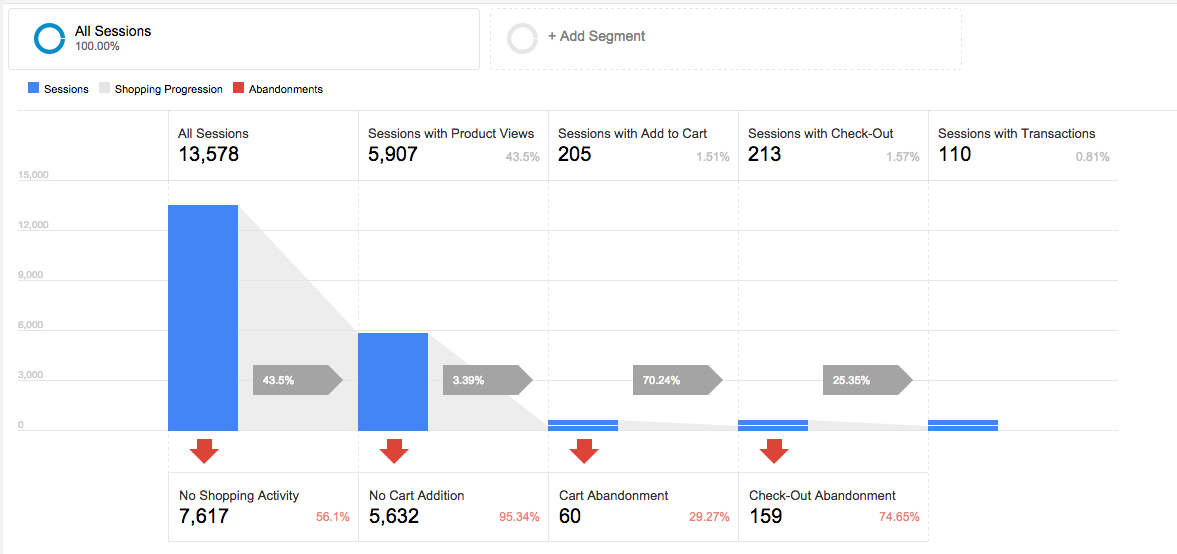
Shopping Behavior Analysis Report
The Shopping Behavior Analysis report is a cool new feature introduced by the Enhanced Ecommerce plugin in Universal Analytics. To ensure the data flows into the report, you need to populate all of the ec:setAction parameters through out the customers lifecycle on your site.
- ga(‘ec:setAction’, ‘detail’);
- This populates the second column of the report
- Set this parameter when a visitor views a Product Detail page.
- ga(‘ec:setAction’, ‘add’);
- This populates the third column of the report
- Set this parameter when a visitor adds a product to their cart. I use an AJAX cart so for my implementation this is set on the success event for the AJAX function. If you don’t use an AJAX cart, you can set this parameter when you display a ‘added to the cart’ success message.
- ga(‘ec:setAction’, ‘checkout’);
- This populates the fourth column of the report
- Set this parameter when a visitor views the checkout process pages. Typically, this is the first page of your shopping cart / checkout process.
- You can have multiple of these setAction – checkout parameters on a site for the various steps of the checkout process. To the best of my knowledge, this report is populated by the first of these parameters that you set.
- ga(‘ec:setAction’, ‘purchase’);
- This populates the fifth column of the report
- Set this parameter when a visitor views an Order Confirmation page.
Pageviews
Ok, this one I already knew, but wanted to ensure you all do. Be careful with how you use the send pageview.
1 | ga('send', 'pageview'); |
Yes, this sends a hit, and as you’re implementing your code you might be tempted to use this to send a value that is just waiting for a hit to be sent. And that is fine. But the caution here is that this populates a page view for your visitor – and that should happen only once per pageview. So in 99% of implementations, you only want to send one pageview per page request. If you need to send another hit to Google Analytics, use the event method instead.
1 | ga('send', 'event', 'Event Category', 'Event Action', 'Event Label'); |
Product IDs
On our site, we have two types of product IDs – a Product ID and an Inventory ID. A Product ID can contain multiple Inventory ID’s. So the Product ID is the ID that identifies a tshirt, and the Inventory ID identifies the color of the shirt that the customer buys. So the list page displays the Product ID, the customer views a Product Detail Page that offers multiple Inventory IDs (colors) and the customer buys an Inventory ID – not a Product ID.
All that explanation is for a reason. As you send requests to Google Analytics for a lis page product impression, a product add to cart, a product purchase, etc. you need to stay consistent – else your reports will have a lot of goose eggs, and zeros don’t help upper management make informed decisions.
So this is just a caution to ensure that you are using the same product ID (when multiple forms are in use) across all of your tracking requests.
Google Analytics Universal Request Parameters
Knowing how data should be sent to Google Analytics can come in handy when debugging. Each piece of data gets sent via a query parameter. For that reason, I’ve put together a list of the parameters I know of that get sent to Google Analytics in a reference chart. Hopefully it can help you out.
View the Google Analytics Universal with Enhanced Ecommerce Request Query Parameter Reference Chart
Request Size
–ADDITION September 22nd, 2015–
The lessons we learn the hard way…
There is a limit to the size of the request that can be sent to Google Analytics. For most requests this probably won’t be an issue, but an example of where this became an issue for me is on an Ecommerce website on the list (category) page when a large number of products are displayed at once. On this page, a ec:addImpression command is added per product with several parameters set for each product. Following the example displayed in the Enhanced Ecommerce implementation documentation, it is advised to queue up each of the ec:addImpression commands and then rely on the ga(‘send’, ‘pageview’); send request to send this data to Google Analytics.
Lets say you display 100 products on this list page – the request gets very large. So large that an error occurs. While I’m not sure where the error lies, it’s either a browser limitation or a limitation with Google Analytics. I know that browsers do have URL length limits (varies per browser – references: #1, #2). Also though, while debugging the problem with Fiddler, I did see one of the requests with a long URL string return a 400 response with the following message:
1 2 3 | 400. That’s an error. Your client has issued a malformed or illegal request. That’s all we know. |
Regardless of where the issue lies, we need to fix this. And I’ll give credit for the solution to this issue report. But the solution comes down to sending an event request after every so many products to prevent hitting this limit. How many products? That’s hard to say really since the data that goes with each ec:addImpression request will vary and we don’t know the real limit we are up against (though most likely 2083 characters). The example linked above used 20 products. For my recent implementation, I set a rule to send a request every 24 products. Why 24? That is the default display on our sites list page with the option to show 100 at a time. I know that 24 has been working reliably for my site, and so that number seemed to be the right between not too many requests and optimizing the size of the request.
Update – Request Size
–ADDITION February 4th, 2016–
There has been some discussion in the comments below that lead me to some more concrete information regarding the request size. Thanks to Ky for providing a link to the proper documentation from Google.
Google Measurement Protocol Reference Guide
There are two ways that a request can be sent to Google – a GET request or a POST request.
GET Requests
A GET request is a single URL with query parameters. The URL does get URL Encoded (special characters get converted to HTML entities, which are additional characters). The maximum size for this URL is 2,000 bytes. For those of us that don’t speak in bits and bytes, 1 byte = 1 character.
POST Requests
A POST request is a request to a specified URL with an attached payload (additional content). The payload is URL encoded (special characters get converted to HTML entities, which are additional characters) like the GET request is, however the payload size limit is much larger. A POST request payload can be up to 8,192 bytes (characters). For us math people – that’s 4 times larger than the GET request.
Using GET and POST to Your Advantage
The logical thought pattern knowing the request sizes is to always send requests via POST. And I think technically this is possible, however I don’t know of a simple parameter to set that will make all requests sent via POST.
But, as Ryan Olson pointed out in the comments below, some requests are sent via POST by default. This information can be useful when designing your strategy on how to best send your requests.
| Request Type | Request Method |
| pageview | GET |
| event | POST |
Avoiding Request Size Limitations
To illustrate this solution, here is a code example written in very general sense – you’ll need to adapt this to fit your coding language.
1 2 3 4 5 6 7 8 9 10 11 12 13 14 15 16 17 18 19 20 21 22 23 24 25 | $counter = 0; foreach( $products as $product ) { $counter += 1; <script type="text/javascript"> ga('ec:addImpression', { 'id': '12345', 'name': 'Product Name', 'category': 'Parent Category', 'brand': 'The Best Brand Ever', 'variant': 'Red', 'list': 'Search Results', 'position': 5 }); </script> if( $counter == 24 ) { <script type="text/javascript"> ga('send', 'event', 'Dummy Event', 'List Page', 'Product Impression', 1, {'nonInteraction': 1, 'useBeacon': true } ); </script> $counter = 0; } } |
Debugging
As I mentioned above, I used to work quite a bit with Adobe Ominutre. Adobe provided a tool for analyzing the tracking requests you sent to them, so debugging and troubleshooting was fairly easy. However Google Analytics does not offer their own such tool.
But it is possible to debug your work here. In my recent implementation, I noticed data was not coming into Google Analytics like I had expected despite me feeling confident about my code. Turns out one of my bugs was a stupid mistake of not populating a tag correctly and thus I was sending text into a numeric field and the entire request was being rejected.
That last sentence brings up a point I want to highlight for your debugging. Just because you are sending data to Google Analytics doesn’t mean that it was accepted by Google Analytics. What do I mean by that? Well just like I said above – I was being thrown off by a request not being recorded that I later realized I was sending text in a numeric field. So the request left the browser just fine, Google Analytics did receive the request, however because the data was not as they expected it to be, they rejected it on their end. So from my browser and debugging standpoint everything was working fine. So the point here is to ensure you check your data – this is both in your requests and in Google Analytics. Make sure it’s sending as you expect and make sure it’s showing in your reports as you expect. After-all – you analytics is only as good as the data within it – if it’s not accurate or being recorded correctly, your data is useless and will mislead your organization.
To properly debug Google Analytics, lets take a second to ensure that we know how analytics works. You set various parameters on the page – lets say a checkout action, and then send that via a pageview hit. What happens is the Google Analytics library will then generate a 1×1 blank image (a pixel) and append to it’s URL path all of the various query parameters it takes to make up the full request. So the values for your checkout action get added to this query parameter string. The browser then loads this image, which sends all of these parameters off to Google Analytics and the tracking request is complete on the browsers end. Google Analytics will now process it, but what happens there is out of the scope of this article and they cover in depth in their Google Analytics Academy program.
So with that background, debugging can be fairly easy – we just need to be able to view the image request being sent and what parameters are attached to it. If we understand what each of those parameters mean, then we can verify that we are passing our data to Google Analytics in the correct format and method and all should be good.
Google Analytics Debugging Tools
Debugging tools don’t like really long requests. But the request does seem to make it to Google still. An example: for a category page where you are listing lets say 50 products. You are instructed to send an impression for each of those products to Google Analytics to power the Product List Performance report. This results in a request to Google Analytics with a LONG string of query parameters. Note the screenshot just below – the top request is from a category page with long list of impressions. The second request is from a click event. Despite the debugging tools not displaying the first request correctly, the data does make it into Google Analytics.
![]()
One way to debug this better is to limit you code to only show one or two impressions to ensure that it is sending correctly. Since this will most likely be in a loop programmatically, you can fairly reliably assume that the other impressions will send fine.
Here are several options for how to see Google Analytics requests.
Google Analytics Trace Debugging
There is a debug mode for Google Analytics that outputs additional information to your browsers console window. This will allow you to see what parameters are set with each request. A LOT of information gets displayed, but it’s some great insights. Here is where you can learn how to enable this mode. Of course use this in your development environment only.
https://developers.google.com/analytics/devguides/collection/analyticsjs/advanced#debug
NOTE: if you don’t have anything displayed to your console, there’s a chance that your sites codebase is blocking the console.log function. Here is an article on how to enable it.
Omnibug
Omnibug has to be my favorite tool for debugging Analytics – it also works for analyzing Facebook, Omniture, and other tracking requests. This is a plugin for either Chrome Web Developer Tools or Firebug (Firefox). It will show the requests sent to Google Analytics for you and display them in an easy to read display.

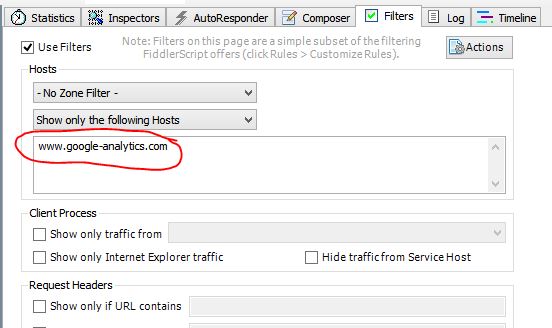
Browser Development Tools Network Panel
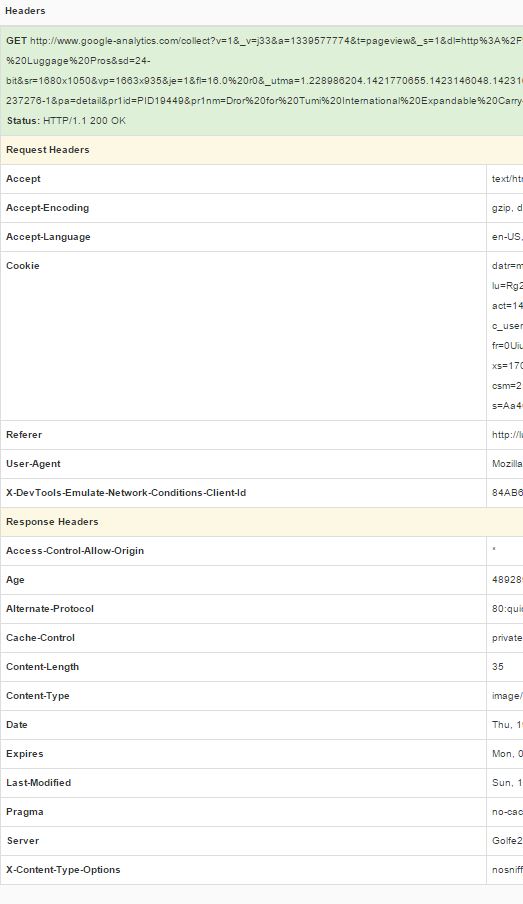
Most browsers now have development tools (or Firebug can be used). The network panel shows all HTTP requests. In the filter box, filter for www.google-analytics.com to show only Google Analytics requests. Those that have collect as the URL path are the Google Analytics requests.
Select the request, and then choose the Headers tab to see the request sent. The display isn’t as clean as Omnibug, but certainly has all of the information.

Fiddler
Fiddler is a free Windows based software that sniffs all HTTP traffic. This can be handy for many reasons, but in this instance we can set a filter for all traffic to www.google-analytics.com and it makes things much easier as there is far less data to weed through. Click on a collect request and then click on the Inspectors tab and then the Web Form option for the request.
Live HTTP Headers
Live HTTP Headers is a Firefox or Chrome plugin that shows HTTP traffic – this is similar to Fiddler but not as full featured. But it comes in handy from time to time since it’s platform agonistic being that it’s a browser plugin.
Admin Settings
Referral Sources
–ADDITION May 4th, 2015–
I’m adding this item to the post late, but I’ve just realized the hard way that I missed yet something else that it would have been VERY NICE to know… After a few months of being on Universal, we started to recognize that some of our channels were down in revenue. After doing some digging through the reporting though, I realized that PayPal was DRASTICALLY up as a referral source in regards to revenue, users, transactions, etc. Now logically this shouldn’t even exist as a referral source – we do not have a link from PayPal to our site. Other than when a user completes a purchase through PayPal and is returned to the site…
Thanks to this post I found, I was able to determine how to fix this issue – well moving forward. As you probably know already, Google Analytics is NOT something you can go and correct data in once it’s been set.
So for the fix, regarding PayPal specifically, there is a way to exclude a referring source in Google Analytics. Now this isn’t something new as the referenced post points out – this is something that could be done through PayPal for Classic Google Analytics. However, Universal Google Analytics doesn’t respect that fix – it instead has a different method of implementing the same feature. You need to set paypal.com as a Referral Exclusion in the Google Analytics Admin. See below – I highlight this a bit more.
What this means, is that you are excluding paypal.com from ever showing up in the Referrals report. Now that may seem strange, but in the case of your external payment gateways it does make clear sense I’d say. Because what happens is your visitor will enter your site via one channel – let’s say they found you through an organic search result. They get tracked as such through their visit on your site, decide to purchase and end up on PayPal’s website. They complete their purchase and are sent back to your site’s success confirmation page. At this point is where the problem happens if you did not exclude paypal.com. What happens is Google Analytics sees this as a new visit session and your customer is tracked as having a second session on your site. Worse yet, because your success page is where you tell GA that the order happened, they get tracked as being referred to your site from paypal.com, not the organic search the initially found your site through. And in the case of the site I upgraded, we’ve been selling for YEARS so this creates a bit of a problem when reporting year over year reporting. As of right now, many of our channels appear to be down compared to last year because of this, when the reality (which we don’t know since the channels are not accurate) is that we probably are doing better than the data shows.
I’ve highlited PayPal here, but if you use other external payment gateways who operate like PayPal in that they take the customer off site and then back again, this is something you’ll want to apply to as well.
Set The Referral Exclusion List in Google Analytics
- Log into your Google Analytics account
- Select your property
- Click Admin from the top navigation
- In the middle column under Property, choose Tracking Info -> Referral Exclusion List
- Click the ADD REFERRAL EXCLUSION button.
- Enter the domain you wish to exclude and click Create.
- NOTE: I’d suggest using a domain with now www at the beginning to ensure all subdomains get excluded, unless you know you only want to exclude a specific subdomain
Google’s official documentation on how referral exclusions work in Google Analytics Universal.
